


34 The Precision Test Environment (PTE)
The T.O.V.A. Precision Test Environment (PTE) was developed and refined over the years to allow accurate, precise T.O.V.A. test timing without additional hardware or connections.
The PTE is an operating system like Windows or macOS, but since it’s dedicated entirely to T.O.V.A. testing, it doesn’t have the inconsistent timing of modern operating systems.
Administering a T.O.V.A. test session in the PTE requires rebooting your computer.
-
Booting the PTE, see section 34.1.
- Using the PTE, see section 34.2.
- Updating the T.O.V.A. flash drive, see section 35.
- Updating the T.O.V.A. CD, see section 35.
- Note: If you are using a desktop computer, with an external monitor and speakers, the T.O.V.A. can administer tests without rebooting. See section 33 for details.
34.1 Booting the PTE
As computers have evolved over the years, we’ve worked hard to adapt the PTE to new hardware and security restrictions.
Most computers will be able to boot the PTE automatically, but some will require special support.
When you install the T.O.V.A. on a new computer, we recommend you test out the PTE—before you bring in patients—and contact us if you encounter problems.
Note: This will not use any of your test credits.
34.1.1 Reset your PTE preferences
To start off, make sure the default preferences are selected.
These will have the best chance of working.
-
Run the T.O.V.A. application.
- In the main window, click ‘Preferences’.
- Under ‘Session launch’, choose the following options:
-
Precision Test Environment (PTE)
- Automatic (on Windows) or EFI System Partition (on Mac).
- immediately
- Click ‘Save’.
Next, test booting the PTE.
34.1.2 Booting the PTE on Windows
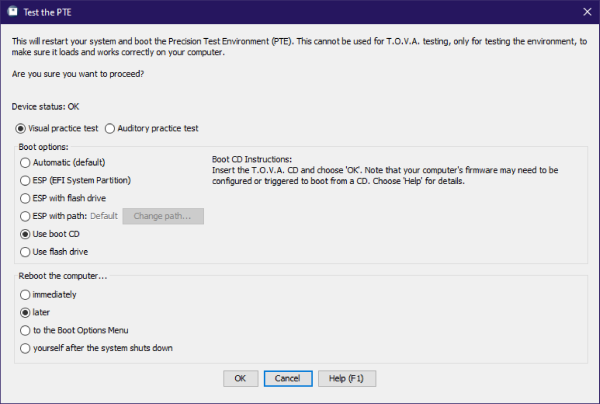
Test the PTE...
Now that we’ve set our preferences, try booting the PTE. (Note: This will not use any T.O.V.A. test credits.)
-
Attach your T.O.V.A. USB device .
- In the main T.O.V.A. window, click ‘Help’.
- In the help window, click ‘Test the PTE...’.
- Click ‘OK’ to reboot your computer.
- If prompted, attach your T.O.V.A. flash drive (a thumb drive with a T.O.V.A. logo) and click ‘OK’.
Your computer should reboot to the Precision Test Environment (Figure 70, with a button to ‘Calibrate display’. Next, please test the PTE itself (section 34.1.4).
If you encounter problems booting the PTE or in the PTE itself, call T.O.V.A. tech support immediately or see section 34.2.3 for some helpful support options.
If rebooting your computer brings you right back to the T.O.V.A. application or errors prevent you from from rebooting, you can save time by sending a tech support request (section 29) before you call.
34.1.3 Booting the PTE on a Mac
Important Note
The 2018 generation of Macs and beyond are starting to incorporate a T2 security chip that blocks the T.O.V.A. PTE from running.
These models and beyond are affected:
-
MacBookPro15,1
- MacBookAir8,1
- iMacPro1,1
- MacMini8,1
If you encounter this problem, please contact T.O.V.A. tech support (section 29) for options.
Mac computers should be able to boot the T.O.V.A. PTE easily:
-
Attach your T.O.V.A. USB device .
- In the main T.O.V.A. window, click ‘Help’.
- In the help window, click ‘Test the PTE...’.
- Click ‘OK’ to reboot your computer.
- Hold the ‘Option’ key while restarting until a menu of boot devices appears.
- Click the ‘T.O.V.A. PTE’ hard disk icon to start the PTE.
- If you don’t see ‘T.O.V.A. PTE’ in the list, use your T.O.V.A. boot media.
-
If your Mac has a CD drive, insert your T.O.V.A. CD.
- If your Mac does not have a CD drive, insert your T.O.V.A. flash drive.
- Click ‘T.O.V.A. PTE’ or ‘Windows’ to start the PTE.
If the above steps don’t work for you or you would like help with them, please contact T.O.V.A. tech support (section 29).
34.1.4 Things to test in the PTE
We highly recommend you test the PTE before your subject is sitting next you, waiting.
When testing the PTE, please do the following:
-
Calibrate your display successfully (section 31.4).
- Adjust the volume to an appropriate level for the instructions and the auditory test tones.
- Run the two-minute Practice test and make sure it appears correctly.
- Click ‘Done’ to return to Windows/macOS.
If all of this works correctly, you should be ready for PTE T.O.V.A. testing.
34.2 Using the PTE
Using the Precision Test Environment (PTE) is simple and straightforward.
There are two versions of the PTE for the T.O.V.A. , "modern" and "legacy", but the two are largely the same.
The T.O.V.A. will boot the PTE version that is compatible with your computer, so don’t worry about choosing the right one.
The main PTE interface mimics the External A/V session interface.
At the top you will see the main subject/session information.
You should be sure that this information is correct, or you may be administering the wrong test!
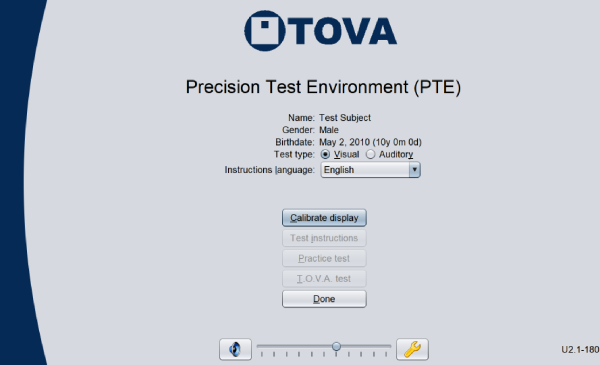
The Precision Test Environment
In the modern PTE you can change to a different Test type (Visual or Auditory) or Test Instructions language (‘Alt’+‘L’).
Note: Even though you can change the test type, you should still only run one test per PTE session.
Running a second test in the same session will overwrite the results for the first test.
In other words, you should run your Visual test and then click ’Done’ to return to your OS and save your test data before trying to run an Auditory test.
Below that information is a column of five buttons, one for each of the five steps of administering a T.O.V.A. test. As you complete each step successfully, a green check will appear beside the button. If instead a yellow warning sign appears, that step did not finish successfully, and you may want to repeat it.

Legacy PTE after a failed calibration
-
Calibrate Display
- - Note: This button only appears for visual testing. The auditory test does not require calibration.
Your first step in the PTE is to calibrate your display, and you must calibrate successfully before you can administer a PTE test.
Thereafter, the T.O.V.A. will remember this information, so the next time you test you won’t have to recalibrate.
When you update your T.O.V.A. software, you’ll have to recalibrate, and if you install a new monitor or video card, you should recalibrate then, too.
Once calibration has completed successfully, a green check will appear next to the button.
This indicates that the PTE has valid calibration data.
If you see a red error circle instead, calibration has failed, and you will need to try again (Figure 71).
See section 31.4 for assistance.
- Test Instructions
- - This will play the test instructions for your subject. See section 36 for more information.
- Practice Test
- - Presents the practice test for the subject. When the subject finishes the practice test, the results of the test will be displayed. If the results look unusual, you may want to go back and review the Test Instructions again, to make sure the subject understood them. You can re-display these results by clicking the small button next to the ‘Practice Test’ button.
- T.O.V.A. Test
- - Administers the T.O.V.A. test to the subject. When the subject finishes the test, a summary of the results will be displayed; this is a good time to be sure that all the stimuli were administered, and there were an appropriate number of button presses. You can re-display this summary by clicking the small button next to the ‘T.O.V.A. Test’ button.
- Done
- - Once you have successfully administered the T.O.V.A. test, you should see four green checks (or three for an auditory test).
Clicking ‘Done’ will return you to your OS, where you can save the test results to the database. (The T.O.V.A. should automatically start up after returning from the PTE.)
- Volume controls
- - At the bottom of the PTE menu are volume controls. You can raise or lower the volume with ‘Alt’ + ↑ or ‘Alt’ + ↓. The speaker button toggles the test instruction audio. Note: If you turn off the test instruction audio, you will have to manually step through the instructions using the right arrow key (→) on your keyboard.
In the legacy PTE, there is an up arrow (↑) button that raises the volume one step and the down arrow (↓) lowers it. In the modern PTE, there is a volume slider instead. Each time the volume is adjusted a brief audio clip will play.
- Advanced
- - If you have problems with the T.O.V.A. PTE, tech support may ask you to access the Advanced PTE menu. Click the wrench button at the bottom of the main PTE menu (or press ‘Alt’/‘Option’ + ‘A’).
34.2.1 Current Advanced Options window
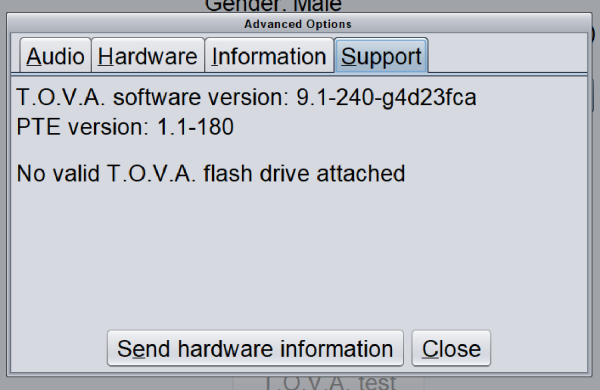
Support tab
The Advanced window in the modern PTE has multiple tabs:
-
Audio
- - Here you can adjust the PTE’s audio settings. If the PTE’s sound isn’t working, try selecting a different audio device. (On some systems, the PTE may find more than one audio device available, even if you have no special devices plugged in.) You can also try adjusting individual audio channels. See section 31.6.2 for more information.
- Hardware
- - Hardware testing options; use only if directed by T.O.V.A. tech support
- Information
- - Only relevant to T.O.V.A. tech support
- Stimuli
- - Display and adjust the visual test stimuli size and brightness, or play the auditory test tones.
- Support
- - If you encounter problems in the PTE, this tab (Figure 72) has several relevant features:
-
PTE version and the T.O.V.A. software version that launched it - This information may be requested by T.O.V.A. tech support.
- Flash drive logging indicator - If attached, the PTE will automatically write diagnostic logs to your attached T.O.V.A. flash drive.
If you have your T.O.V.A. flash drive attached (a thumb drive with a T.O.V.A. logo), but this tab indicates that it’s not logging to it, detach and reattach it.
- Send hardware information - If you don’t have a T.O.V.A. flash drive, clicking ‘Send hardware information’ will write logs to your attached T.O.V.A. device instead.
Note: This will overwrite any session data on the T.O.V.A. device, so don’t choose this option if you were able to test successfully.
34.2.2 Legacy Advanced menu
There are several Advanced options available in the legacy PTE:
-
[C]hange audio device
- - On some systems, the PTE may find more than one audio device available, even if you have no special devices plugged in. Click the right one, or try them all. Hit the ‘1’ key for the first device, ‘2’ for the second, etc. See section 31.6.1 for more information.
- [A]djust audio levels
- - The main PTE menu lets you adjust the volume up or down. If the volume is still wrong or the sound is distorted, you may need to make special adjustments here. See section 31.6.2 for more information.
- Adjust [S]timuli
- - Use the keys below to change the shape and brightness of the visual test stimuli. Stimuli should appear as three-inch squares (measured diagonally). You can also display the stimuli here to help prepare your subject for testing.
-
↑ ↓ : Adjust stimuli height
- ← → : Adjust stimuli width
- + - : Adjust stimuli brightness
- + Control : Fine adjustment (e.g., ‘Ctrl’ + ‘↑’ makes the stimuli a small amount taller.)
- T N F : Display Target, Nontarget, or Focus Stimulus
- Enter : Save changes
- Esc : Discard changes
- Send [H]ardware information
- - If you encounter problems, this will tell us all about how the PTE sees your system’s hardware.
- Send [D]evice communication log
- - This log can give us information about PTE problems that Hardware Information does not.
34.2.3 Problems in the PTE
Maybe the PTE is displaying a strange error.
Maybe you’re stuck at a black screen with a bunch of techno-jargon.
Maybe the sound doesn’t work, even after you turn it up.
Whatever is going wrong, here are the best steps to take first:
-
If you can, call T.O.V.A. tech support immediately, preferably while any error still appears on the screen.
- It also helps to email a photo of any error screen to support@tovatest.com.
If it’s a black screen full of techno-jargon, make sure the last five or ten lines at the bottom are readable.
Please include your T.O.V.A. serial number, which you can find on a sticker on the bottom of your T.O.V.A. USB device .
- If you cannot call immediately, please plug your T.O.V.A. flash drive (a thumb drive with a T.O.V.A. logo) into your computer.
This drive can collect logs on the problem you encounter, helping us to understand it better.
(If you don’t have an empty USB port, you can unplug your T.O.V.A. USB device and plug the flash drive into that one, but this can ERASE any unsaved test data!)
34.2.4 What if I can’t boot the PTE automatically?
If you launch the PTE from Windows using the ‘Automatic (default)’ boot option, the T.O.V.A. service will boot the PTE the best way it can find.
If the service cannot find a way to boot the PTE automatically, though, don’t give up hope.
Please click ‘Send to tech support’, so that we can assist you.