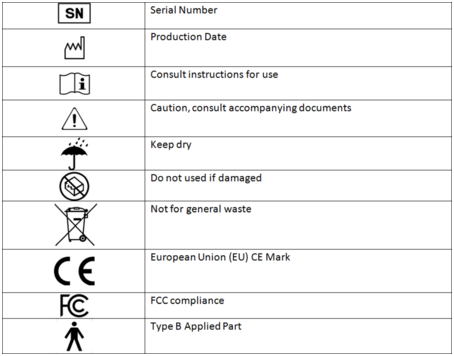
 International Symbols applicable to the T.O.V.A.
T.O.V.A.® 9.0 User’s Manual
Test Of Variables of Attention Continuous Performance Test
Scott Swalwell, Sr.
Andrew Greenberg, MS
Tammy Dupuy, MS
The TOVA Company
3321 Cerritos Avenue
Los Alamitos, CA 90720 USA
| Phone: | 800.PAY.ATTN or 800.729.2886 or 562.594.7700 |
| Fax: | 800.452.6919 or 562.594.7770 |
| Referrals: | 800.REF.TOVA or 800.733.8682 |
| Email: | info@tovatest.com |
| Web: | http://www.tovatest.com/ |
Edition Number 9.0-101-g9ed7743 () L3R2
T.O.V.A. release
© Copyright 2009-2017 The TOVA Company, All Rights Reserved.
Test Of Variables of Attention (abbreviated T.O.V.A. ) is a registered trademark of The TOVA Company.
No part of this manual may be distributed without permission of The TOVA Company.
Orders of this manual should be directed to:
The TOVA Company
3321 Cerritos Avenue
Los Alamitos, CA 90720, USA
800.PAY.ATTN 800.729.2886 +1.562.594.7700
Fax 800.452.6919 +1.562.594.7770
Printed in the United States of America.
Important Information |
The Test of Variables of Attention (T.O.V.A. ) provides healthcare professionals with objective measurements of attention and inhibitory control, which aid in the assessment of attention deficits, including attention-deficit/hyperactivity disorder (ADHD). T.O.V.A. results should only be interpreted by qualified healthcare professionals.
CAUTION: Federal law restricts this device to sale by or on the order of a qualified healthcare professional.
The T.O.V.A. microswitch and USB device should not be used in conjunction with an MRI.
WARNING: Repetitive flashing of display may cause eye strain, headaches or seizures. Please seek medical help if you experience any eye strain or headache.
The T.O.V.A. microswitch is a Type B Applied Part, i.e., a part of the system meant to be handled by the subject. The T.O.V.A. USB device and associated cables are not applied parts, and are not meant to be handled by the subject.
The T.O.V.A. can only be connected via the USB connector: Only connect the USB input to equipment that is certified to UL 60950-1 and IEC 60950-1.
The T.O.V.A. microswitch should be cleaned in between subjects. See section 7 for directions.
The T.O.V.A. is designed to be stored, operated and transported in a standard indoor environment: a temperature of 10 to 40 C (50 to 104 F), 0 to 100% relative humidity, and an atmospheric pressure of 64.4 to 106.6 kPa.
T.O.V.A. results should be interpreted only by qualified professionals.
Do not interrupt the T.O.V.A. test while it’s being administered. Selecting ‘Esc’ will result in the test being interrupted.
Do not open the T.O.V.A. hardware enclosures; there are no user serviceable parts inside the T.O.V.A. hardware.
Do not unplug the T.O.V.A. hardware when in use (during a test). This will result in lost session data.
Always make sure that your PC is plugged into a power outlet during test mode. A low battery during a test session may cause the test data to be lost.
Caution: If a new display or new PC is used, the display must be recalibrated prior to administration of the T.O.V.A. test.
The T.O.V.A. 9.0 does not support network share databases. Storing data on a server or network share will most likely result in lost data. Please only use the T.O.V.A. with a local database.
We always recommend that you back up your T.O.V.A. database before installing or uninstalling the T.O.V.A. . Automatic local database backups are built into the T.O.V.A. application and enabled by default, but we recommend that you also regularly back up your database (and the rest of your PC) to a secure location.
Warning: The surface of the T.O.V.A. microswitch may become hot (41 C / 106 F) during use. Discontinue use if holding the switch becomes uncomfortable.
This device complies with part 15 of the FCC Rules. Operation is subject to the following two conditions: (1) This device may not cause harmful interference, and (2) this device must accept any interference received, including interference that may cause undesired operation.
This equipment has been tested and found to comply with the limits for medical devices to the IEC 60601-1-2. These limits are designed to provide reasonable protection against harmful interference in a typical medical installation. This equipment generates, uses and can radiate radio frequency energy and, if not installed and used in accordance with the instructions, may cause harmful interference to other devices in the vicinity. However, there is no guarantee that interference will not occur in a particular installation. If this equipment does cause harmful interference to other devices, which can be determined by turning the equipment off and on, the user is encouraged to try to correct the interference by one or more of the following measures:
The T.O.V.A. database may contain private or personal Protected Health Information (PHI). While the T.O.V.A. accomodates the need to protect PHI, the database itself is not secured or encrypted by the T.O.V.A. application. Instead, you can secure access to the T.O.V.A. database and backup folders within your OS (Windows or Mac OS)—just be sure that all authorized users of the T.O.V.A. have full permissions on the system to the database folder and its subfolders.
We also expect users will follow information security best practices on the host PC, among which are these:
The T.O.V.A. uses SSL to secure any communication with our servers that might contain personal information, and no PHI is collected without your consent. Any information on our servers is securely maintained.
The Test of Variables of Attention (T.O.V.A. ) is an accurate and objective continuous performance test (CPT) that measures the key components of attention and inhibitory control. The T.O.V.A. is used by qualified healthcare professionals in the assessment of attention deficits, including attention-deficit/hyperactivity disorder (ADHD), in children and adults.
The T.O.V.A. is a culture- and language-free, sufficiently long computerized test that requires no left/right discrimination or sequencing. Responses to visual or auditory stimuli are recorded with a specially designed, highly accurate (±1 ms) microswitch. The T.O.V.A. calculates response time variability (consistency), response time (speed), commissions (impulsivity), and omissions (focus and vigilance). These calculations are then compared to a large age- and gender-matched normative sample (over 1,700 individuals for the visual test, and over 2,600 individuals for the auditory test), as well as to a sample population of individuals independently diagnosed with ADHD. These comparison results are used to create an immediately available, easy-to-read report.
The T.O.V.A. system includes:
Because the T.O.V.A. microswitch comes in direct contact with a patient, it should be cleaned after every use.
The T.O.V.A. USB device and all associated cabling do not require cleaning. If you wish to clean it, please follow these instructions.
Getting Started |
Welcome to the T.O.V.A. 9.0 User’s Manual. Feel free to jump right in and install the T.O.V.A. by skipping to “Installing the T.O.V.A. ” (section 9.12), but we’ve included this section in case you’re not familiar with the T.O.V.A. . We’ll tell you a bit about the T.O.V.A. and answer some common questions about it.
This manual is the T.O.V.A. version 9.0 User’s Manual. It is meant to help you with all things technological about the T.O.V.A. .
There are other manuals that may help you.
See the T.O.V.A. device description (section 6).
The T.O.V.A. 9.0 is used by qualified healthcare professionals, such as psychologists, physicians (including psychiatrists, neurologists, pediatricians and family practitioners), physician assistants, researchers, pharmaceutical companies, licensed clinical counselors, nurse practitioners, and clinical nurse specialists.
For more information, please see our website at http://www.tovatest.com/.
It’s quite simple: the T.O.V.A. flashes stimuli on the screen (or beeps stimuli on speakers) and the subject taking the T.O.V.A. test responds as quickly and as accurately as they can with a small handheld microswitch. This kind of ‘stimulus and response’ test is called a continuous performance test (CPT), and the T.O.V.A. is one of many on the market—the best, we believe!
Both the auditory and visual T.O.V.A. tests are 21.6 minutes long. (A shorter 10.8-minute test is administered to subjects ages 4 to 5.5.) The visual test has two simple images that alternately flash on the screen, and the subject presses the button after the correct square. The auditory test has two tones, and the subject presses the button after the higher tone. Both tests are horribly, terribly, inhumanly boring. But this is a good thing because you just can’t fake it with the T.O.V.A. .
The T.O.V.A. takes the subject’s responses and compares them to a study with thousands of ‘normal’ people—that is, people who were screened for attention (and other disorders) and were deemed normal. This is called the T.O.V.A. norming study, and it allows us to figure out where the subject’s responses fall on the ‘bell curve’ of normal. It is critical that the number of people in a norming study is large, and the T.O.V.A. still has the largest norming study of any CPT. The T.O.V.A. also compares the subject’s responses to a study of people diagnosed with ADHD.
These comparisons are not diagnoses! Only a clinician can make a diagnosis. The T.O.V.A. simply aids the clinician with their assessment of attention deficits.
The T.O.V.A. measures attentional variables—that is, it measures how people respond to a long, boring test. There are over 250 peer-reviewed papers on the T.O.V.A. that show how these variables correspond to attention deficits, and how the T.O.V.A. can be used. See the T.O.V.A. website (http://www.tovatest.com/) for a list of papers published about or using the T.O.V.A. .
In particular, the T.O.V.A. measures these variables (listed in order of importance):
Because response times, and even more importantly, the variability of response times, are the core of any CPT, the T.O.V.A. was designed with very high timing accuracy. Although people respond to stimuli in hundreds of milliseconds, the consistency of response times can be only tens of milliseconds. And because that’s the most sensitive variable in a CPT, it’s crucial that the response timing on a CPT be precise—and reliable.
We like to say that the T.O.V.A. has ‘research-grade’ timing accuracy, because our timing is just that good. But what’s just as important is that the timing is reliable. And so we go out of our way to make sure the T.O.V.A. is a reliable test.
Unfortunately, modern operating systems like Windows, OS X, and most flavors of Linux don’t guarantee reliability when it comes to timing. In fact, they do the opposite: they guarantee that eventually they will introduce latencies and variable delays in timing. Modern operating systems have been designed from the ground up to be reasonably fast for users’ demands, but not to be reliably and consistently fast. Have you ever seen your computer hesitate just a split second before it does what you asked it to do? Happens all the time, right? That hesitation will make any CPT running on these operating systems unreliable.
We realize other people say you can still test in Windows or other modern operating systems, but they’ve never (to our knowledge) objectively measured their timing performance with an external timing validation system. We have. We’ve measured timing reliability under Windows (and Macintosh OS X), and it stinks.
So how do we get around this timing issue?
The T.O.V.A. 9.0 has two ways of resolving this:
We charge per test because we care that you have the very latest in tools to help you improve people’s lives. This may sound like advertising, but we truly do believe it. Your clinical tools should be constantly improving as new research and new ideas comes down the pipeline, and the T.O.V.A. will do this.
So instead of charging you an arm and a leg for the T.O.V.A. and leaving you in the dust as it improves, we instead charge you per test and then give you new versions of the T.O.V.A. for free. Yes, for free. More norms? Free. Improved user interface? Free. New statistics? Free.
Note: There is a charge for the T.O.V.A. 9.0 hardware–please contact T.O.V.A. customer service for details (section 27).
And we support you like no other testing company can: technical support is free. Whenever you have a question or problem with the T.O.V.A. , contact us and we’ll help you. We’re crazy about supporting our users, so really don’t hesitate to call us if you can’t figure out something about the T.O.V.A. .
And, even more importantly, interpretation support is free. This means we have staff whose job it is to help you interpret T.O.V.A. results. Wondering how to identify malingering? Do you need help understanding how comorbid disorders affect T.O.V.A. performance? Are you baffled by the results of your last subject? Call us! We’ll help you understand it.
So in summary, our per-test charge allows us to provide you with an excellent, constantly evolving test of attention with full customer service. We think that’s a pretty good deal.
The T.O.V.A. has its roots in a 1966 National Institute of Health-funded research project. The equipment that gave that CPT literally took up an entire wall. With the onset of the personal computer, it was ported to the Apple IIe (and called the VIRTEST), then the Macintosh, and finally to the PC. The T.O.V.A. has over 40 years of ongoing research behind it.
This includes, but is perhaps not limited to, the following models:
The following items should be included in the kit:
We have a whole section about devoted to Using the T.O.V.A. (section 17).
Here’s where you can find answers to some other general questions:
See our Frequently Asked Questions section, section 37.
Installing the T.O.V.A. |
In this part of this manual, we’ll help you install the T.O.V.A. hardware and software.
Note: You will need to log in as an administrator to install the T.O.V.A. 9.0. If you own your computer, then you most likely have administrative access to your computer. If your computer is part of a large organization and you have an IT staff that installs programs for you, you will probably want to contact them to install the T.O.V.A. 9.0. You can run the T.O.V.A. as a normal or limited user, but it can only be installed by an administrator.
Note: To use the T.O.V.A. 9.0 software, you will need T.O.V.A. 9 hardware. You cannot administer the T.O.V.A. test with T.O.V.A. 7 or T.O.V.A. 8 hardware. Please contact T.O.V.A. Customer Service (section 27) to purchase a T.O.V.A. 9.0 kit before installing the T.O.V.A. 9.0 software.
Steps to Install the T.O.V.A. 9.0
Note: Windows 8 and 10 systems may require Internet access to install the .NET Framework.
Note: During or after install, your system’s firewall or antivirus software may alert you to changes we are making to your system. If we don’t make these changes, the T.O.V.A. may not function correctly. When asked, please choose ‘Allow’, ‘Unblock’, or whatever allows the installer to proceed.
Once you see the Welcome screen (Figure 4), the installation has begun. Click ‘Next’.
If you accept our License Agreement (Figure 5), choose ‘I Agree’ and click ‘Next’. If you don’t accept it, then you can’t install the T.O.V.A. 9.0, so click ‘Cancel’. And then please give us a call, because we’d love to know why you don’t agree with it.
From this point on, we strongly recommend that you accept all defaults (just click ‘Next’).
Figure 6 shows the Destination Location page. You will probably want to accept the default.
While the T.O.V.A. 9.0 files are installing, you’ll see Figure 7. It could take a few minutes.
Note: If prompted during install, follow the steps to install .NET Framework 3.5.
You’ve finished installing the T.O.V.A. files. You’ll notice in Figure 8 that ‘Configure T.O.V.A. 9.0 system preferences’ is checked by default. The T.O.V.A. 9.0 installation has finished, and your next step should be to configure the T.O.V.A. 9.0 for this system. Proceed to section 12.
First, the installer will check whether your system meets the minimum system requirements for running the T.O.V.A. 9.0. Click ‘Continue’.
Once you see the Introduction screen (Figure 10), the installation has begun. Click ‘Continue’.
The release notes for the current version are displayed. Click ‘Continue’.
The software license agreement for the T.O.V.A. 9.0 is displayed. Click ‘Continue’ after reading, then click ‘Agree’ to proceed with installation.
This screen shows how much space will be taken by the installation and is the final confirmation before installation takes place. The install location is the /TOVA folder in the Applications directory of your main volume. Documentation is placed in the Docs folder therein. Do not change the install location or else automatic web updating will not work correctly. Click ‘Install’ to begin installation.
You will then be asked for your password in order to briefly grant the administrator privileges required to complete installation. Enter your password and click ‘OK’.
Installation should complete in a few seconds. Press ‘Close’ to quit.
You’ve finished installing the T.O.V.A. files. The T.O.V.A. 9.0 installation has finished, and your next step is to configure the T.O.V.A. 9.0 for this system. Proceed to section 12.
The T.O.V.A. Configuration wizard will walk you through the most important settings your Administrator should review:
You can always go back and change these options later under ‘Preferences’. Changing Admin preferences may require running ‘T.O.V.A. Admin Settings’ (see section 25.1). See section 25 for more information on T.O.V.A. Preferences.
Once you have saved your configuration selections, you should install the T.O.V.A. 9.0 hardware. Proceed to section 13.
The T.O.V.A. is software and hardware. The hardware includes:
No qualification is necessary to install the T.O.V.A. software and hardware. T.O.V.A. hardware components are not user-serviceable and instead should be returned to The TOVA Company for repair. Technical Support is available if you have questions (section 27).
Note: Do not plug the USB cable into a USB hub. USB hubs will cause intermittent communication problems between the T.O.V.A. software and the T.O.V.A. USB device . USB hubs are not supported.
After you’ve connected the T.O.V.A. USB device to the computer as suggested above, there are additional connections to make for External A/V (or EAV) testing (tests that don’t require rebooting your computer.)
Note: If you have a laptop and you want to run an EAV test, you must have an external monitor (and external speakers for the auditory test).
Note: If you have any problems, you can find instructional videos at http://videos.tovatest.com.
Now you should be set up to administer EAV sessions.
Note: If you are using two displays—either an external monitor plugged into a laptop or simply two different external displays—make sure that the subject cannot see the non-testing display during testing, as it could be distracting.
If you’re installing the T.O.V.A. for the first time, you should see the first page of the T.O.V.A. Hardware Setup wizard that immediately follows the Configuration wizard. We recommend that you complete the Hardware Setup wizard to confirm that you’ve attached your hardware correctly. Please continue on to the section 14.
The Hardware Setup wizard starts automatically after you finish the Configuration wizard (section 12), and it helps you to test your T.O.V.A. hardware connections to make sure you’re set up correctly. The T.O.V.A. hardware must pass each test to go on to the next page. If you haven’t set up your hardware yet, please see section 13 first.
Note: Which pages you see will depend on which hardware setup you selected in the Configuration wizard.
When you see the first page of the Hardware Setup, it’s time to attach your T.O.V.A. hardware. Follow the “Installation Guide” included with your T.O.V.A. 9.0 kit. When you have finished installing your hardware, click ‘Next’ to begin testing your hardware and connections. If you have questions about installing your hardware, see section 13.
The first test of the Hardware setup wizard tries to detect your T.O.V.A. USB device . If it reports “No T.O.V.A. devices found”, you may not have attached the device correctly. See section 29.1.3 to help you troubleshoot this problem, and click ‘Refresh’ to try detecting the device again.
When your T.O.V.A. USB device has been detected, click ‘Next’ to continue.
Once your device has been detected, we next ask you to test that your microswitch is correctly attached and working. Choose ‘Check microswitch’ and press the microswitch button ten times. Be sure to press the button exactly ten times: If the microswitch test persistently reports more or fewer presses than you give it, you should contact The TOVA Company to replace your microswitch immediately.
When your microswitch test passes, click ‘Next’ to continue.
Note: If you chose the EAV hardware setup, you should skip to the next section (section 14.5).
This is the last step of the PTE Hardware Setup wizard. By now you have your T.O.V.A. USB device and microswitch attached correctly. Next, you should test the PTE, where you will be administering tests to your subjects. Testing the PTE is important for several reasons:
For more information on testing the PTE, see section 31.1.
Once you’ve tested the PTE, you have finished verifying your PTE Hardware Setup. Congratulations! You’ve finished installing the T.O.V.A. ! We strongly recommend that you go ahead and read the quick and helpful ’Using the T.O.V.A. ’ guide: See section 17.
Note: If you chose the PTE Hardware setup, you will not see this page of the wizard nor those following.
There are a few more attachments to verify for the EAV Hardware setup. Click ‘Check EAV Video’ and—if your video attachments to your computer, T.O.V.A. USB device , and monitor are correct—the device will send a T.O.V.A. image to your screen for a few seconds.
If you do not see the images (the T.O.V.A. logo, visual test stimuli), make sure that ’video out’ is connected to your display and ’video in’ is connected to your computer’s VGA port: It’s easy to reverse them.
When your video test passes, click ‘Next’ to continue.
Next, we want to verify that your audio cables are attached correctly to your computer, your T.O.V.A. USB device , and your speakers, and that the volume is appropriate to your system.
Choose ‘Play EAV test audio’ to play a series of sounds to verify the connection between your T.O.V.A. USB device and speakers. Choose ‘Check PC sound’ to test your system volume and the entire audio connection. For more information on adjusting and troubleshooting audio problems, see section 29.7.
When you have verified that your audio is working and the volume is properly adjusted, click ‘Next’ to continue.
Once you’ve reached this page, you have verified that your hardware is installed correctly for EAV testing. Before you finish, though, click ’Calibrate display’. Successful display calibration is required before you can administer a Visual T.O.V.A. test. See section 18.5.1 for more information.
Congratulations! You’ve finished installing the T.O.V.A. ! We strongly recommend that you go ahead and read the quick and helpful ’Using the T.O.V.A. ’ guide: See section 17.
There may be times when you’ll want to uninstall the T.O.V.A. 9.0. We’ve done our best to make that process simple and straight-forward.
WARNING! We always recommend that you back up your database before installing or uninstalling the T.O.V.A. . You can never be too careful!
Note: Even a clean uninstall will not remove the .NET Framework or the Java Runtime Environment (if installed with a previous T.O.V.A. version). You can select and uninstall those separately, but we do not always recommend it. They may be required for other software you have installed.
Click ‘Next’ when you have selected your options.
There may be times when you’ll want to uninstall the T.O.V.A. 9.0. We’ve done our best to make that process simple and straight-forward.
WARNING! We always recommend that you backup your database before installing or uninstalling the T.O.V.A. . You can never be too careful!
You can remove the T.O.V.A. application and manuals by dragging the folder /Applications/TOVA to the Trash. You may need to type your password or administrator password to delete this folder. This will leave behind:
We have also included a command script on the T.O.V.A. flash drive to remove all traces of the T.O.V.A. from your system. You will find it in TOVA9/utilities/mac_uninstall.command. Double-click on this script in the Finder to run it. Type “uninstall” to confirm, and your password to authenticate when indicated. If you want even the T.O.V.A. database removed, type “delete” when asked, but please note that this will remove all your T.O.V.A. test data.
To uninstall the T.O.V.A. hardware, simply do the opposite of the instructions above in Installing the T.O.V.A. Hardware (section 13).
If you have the EAV (External A/V ) hardware setup, you may disconnect those connections first:
Once any EAV connections are removed, disconnect the rest of the hardware:
This will terminate operation of the T.O.V.A. USB device .
Using the T.O.V.A. 9.0 |
In this part of this manual, we’ll show you the parts of the T.O.V.A. you’ll use on a regular basis.
In this section of the manual, we’ll give you practical, basic instruction in how to administer the T.O.V.A. test using the T.O.V.A. 9.0.
There’s a simple series of steps you’ll need to do in order to administer the T.O.V.A. test:
Preparing the subject is crucial, because it assures that the test is administered properly and replicates the same conditions as the T.O.V.A. norms. This includes when, where, and how the test should be administered.
You may also want to enter the subject and session information before the subject arrives. Next, we’ll tell you how to do that.
Administering a T.O.V.A. test starts at the main window. Here you may select a subject or create a new subject.
Creating a new subject is easy.
Notice first the red labels on Birthdate and Gender (Figure 27). These are the only required fields for creating a new subject. While entering a subject name is usually helpful, some users may prefer to leave out the subjects’ names altogether to better protect personal health information.
Note: Entering dates in the T.O.V.A. is easy, but the format depends on the preferences that are set in your operating system (e.g., Windows). For instance, if you’re in the United States, dates are most likely in the format ‘mm/dd/yyyy’, but in Europe they’re probably ‘dd/mm/yyyy’. When entering the birth date, please check the age to make sure you’ve entered it right. A shorter 10.8-minute test is administered to subjects under six, so an incorrect date of birth can result in the wrong test format.
Notice also our custom field, ‘Favorite color’. You will not see this field, of course, but you may see other custom fields that your organization has created. For more information on Custom Subject and Session fields, see section 25.3.
That’s it! You’ve created a new subject in the T.O.V.A. .
If you’ve already created the subject, the next step is to find and select the subject you want to test. Near the top of the main window (Figure 26) is a search bar. Here you can search for the subject you want to test by name, subject number, birthdate, test date, or any custom fields you’ve created. This will be an important tool once you’ve administered a few dozen tests.
For more search techniques, see section 35.2. Another way to find your subject quickly is by clicking on the column headers. Click once to sort the table on that field and again to reverse the sort order.
Once you’ve found the subject you want to test, highlight the subject and click ‘New Session’.
Now that we’ve selected a subject and started a new session, we can enter a little information about this test session and launch the session. You should choose now between administering a Visual or Auditory test and make sure that the age and test date is correct.
Note: It is critical that the subject’s gender and age is correct. Any mistake here will invalidate the accuracy of the T.O.V.A. report, since comparison to the T.O.V.A. norming study must be done for the proper gender and age group.
Adding treatments, including medications and dosages, will aid in interpreting the test. In addition, you can enter the name of the tester, fill in any custom fields, or add comments, but none of these are required before administering a T.O.V.A. test session. And you can always add or modify session information after the session has been administered.
At the bottom of this window, under ‘Session Launch’, you will see a brief description of how the session will be launched. The settings here will always default to what the administrator has specified in the Preferences (section 25.12), but if you want to change these settings for this session, click on the ‘Options’ button.
From the New Test Session window (section 18.4), click ‘Instructions language’ to change the test instruction settings for the session you’re about to give. This is also where you can mute the instruction audio, if you prefer to read and advance the instructions at your own pace. See section 33 for more information on the T.O.V.A. test instructions.
When you’ve chosen your settings, click ‘Close’, or choose ‘Save as defaults’ if you’d like to make your changes permanent.
Let’s say you decide you want to prepare your system to launch the PTE session, but you want to ‘Reboot later’ after you finish writing an email. Any change you want to make from the way the T.O.V.A. usually launches a session, you can make here.
Once you’ve configured the session launch options how you want them for this session, click ‘Close’. If you’d like to save these as your new default launch options, choose ‘Save as defaults’ instead. For more information on your launch options, see section 25.12
Now let’s look briefly at the two testing environments.
The T.O.V.A. 8 added a new kind of T.O.V.A. test session, the External Audio/Video session, that does NOT require rebooting your system. That’s because instead of relying on your system clock, video, etc., the new T.O.V.A. hardware handles the timing itself.
What an External A/V session DOES require is a desktop system or a laptop with an external monitor (and speakers for the Auditory test). See section 32 for more information.
Note: Please make sure to disable, at least temporarily, any Sleep/Standby/Hibernate power settings for your system. Because External A/V testing does not use the keyboard or mouse, some systems will shutdown due to inactivity. See section 34.8 for more information.
The T.O.V.A. 9.0 also continues to offer the Precision Test Environment (PTE). Using the PTE requires rebooting your system, so be sure to save your work in other applications before launching the PTE.
For more information on the Precision Test Environment, see section 31. For information on PTE launch options, see section 25.12.
Once you’ve entered all the test session information and set up the launch as you want it, click ‘Launch’ to start the T.O.V.A. test session. As you can see from the screenshots above, both testing environments have the same basic steps to administer a T.O.V.A. test.
Note: Always make sure that your PC is plugged into a power outlet during test mode. A low battery during a test session may cause the test data to be lost.
Note: If you’re administering an Auditory T.O.V.A. , you will skip this step and go right to test instructions, section 33.
There are more different kinds of monitors than ever, and because accurate, precise timing is so critical to testing, we’ve added a new feature to the familiar T.O.V.A. microswitch.
With this sensor and a brief 10-to-30-second calibration, we can conform the timing of the T.O.V.A. test to idiosyncrasies in your monitor. There will be some monitors that are too unpredictable for the T.O.V.A. to work with. By performing this calibration step, we can recognize and alert you if your monitor’s timing will be out of range.
Calibration will take 10-30 seconds. Once we’ve calibrated the T.O.V.A. to your monitor, the T.O.V.A. will store that data, so you only have to calibrate once for EAV testing and once for PTE testing (See section 32 for more on the differences). Note: If you install a new monitor or video card, it’s important that you recalibrate the T.O.V.A. to that new hardware.
Note: See section 29.4 for more information if you encounter problems during calibration.
The next step is giving the subject instructions on how to take the T.O.V.A. test. Click the ‘Test Instructions’ button to start the multimedia test instructions. See section 33 for more information on test instruction languages, controls, and options.
After receiving the test instructions, the subject should take a two-minute practice test. When you click ‘Practice Test’, the subject will receive a few final instructions; then the subject will be prompted to click the microswitch to begin the practice test.
When the practice test is complete, the T.O.V.A. automatically displays the results. If there were a lot of Omissions or Commissions (Figure 35), perhaps the subject needs further explanation. The subject can re-take the practice test if necessary.
When you click ‘T.O.V.A. Test’, the final instructions before the T.O.V.A. test will be given, and the subject will be prompted to click the microswitch to begin the T.O.V.A. test.
If the T.O.V.A. test is interrupted (by pressing ‘Esc’ or if there is a hardware failure), a message will appear asking the user to ‘Continue’, ‘Restart’, or ‘Abort’ the T.O.V.A. test. For the best results, we recommend that you ‘Restart’ any interrupted test. Click ‘Abort’ to stop the test before it is finished—you will be prompted to either save the unfinished test’s data or erase it. Click ‘Continue’ to resume the test where the subject left off. Any interruptions will be noted in the test data and on the report.
Once the T.O.V.A. test is completed, a summary of the finished test will appear. If you are using the PTE, this will appear after you boot back to your OS. Make sure to examine the summary before saving the data. If there are very few button presses, perhaps the subject did not understand the test instructions. If not all the stimuli were shown, the test may have been aborted before it was complete. In either case, it may not be worth using a test credit to save the T.O.V.A. data, and you may choose to ‘Erase data’.
If the summary information looks fine, choose ‘Save test results’ to retrieve the T.O.V.A. test results and store them in the T.O.V.A. database. If you’re not sure whose test this is, you can view the subject information by clicking ‘More information’.
Note: You must use a test credit to save the T.O.V.A. test data. If you ‘Continue without saving’, the T.O.V.A. test results will remain on the device, but they will be lost the next time a T.O.V.A. test is administered. For more information about test credits, see section 20.
Next, you have option to view a report on the test data immediately. Choose ‘View report’ to see a report now or ‘Cancel’ if you’d prefer to see the report later. The report can be viewed afterward at any time. You can also choose ‘Add information’ to add/edit session information before you view the report.
For more information on the T.O.V.A. report, see section 19.
Congratulations! You’ve just administered a T.O.V.A. test!
The T.O.V.A. test data is now stored in your database along with the subject information. So what do you do now?
When you are finished using the T.O.V.A. for the day, please exit the T.O.V.A. application by clicking ‘Quit’ in the main T.O.V.A. window. There is no operation to “power down” the T.O.V.A. USB device and no need to disconnect the T.O.V.A. hardware when not using it, so we recommend that you keep the T.O.V.A. USB device attached. If it’s convenient, you may uninstall the T.O.V.A. hardware when you are not using the T.O.V.A. application (see section 17), but we recommend that you save your test data first.
Note: T.O.V.A. results should be interpreted only by qualified professionals.
Viewing a report is easy. In the main window, highlight the session you want to report on and choose ‘View’.
Note: If you want to view a comparison report, highlight more than one session using Shift-click or Ctrl-click. The ‘View’ button becomes a ‘Compare’ button, and when you choose it, you will see a graph comparing the highlighted sessions. For more information on the comparison report, see section 19.2.
While you’re viewing a report, you have other options:
On the left of the report window is a list of the pages of the report. Highlight a page to view it in the right pane.
Choose ‘Customize’ from the Report window, and you’ll find several ways to customize the T.O.V.A. report:
Note: By default, new custom fields do not appear in the T.O.V.A. report until they are selected, and even then, the field will only appear if it has a value. In other words, if you set no value for Sarah’s hair length, that session’s report will not display “Hair length: ”, it will just not appear.
Once you’ve made your changes, choose ‘Apply’, or choose ‘Set as default’ to apply your changes to this and all future reports. Close the window to abandon your selections.
When you select more than one session in the main window, the ‘View’ button becomes a ‘Compare’ button. Click it to bring up a report with graphs comparing statistics of the selected sessions.
You can highlight multiple sessions using ‘Ctrl’-click (Mac users, ‘Command’-click) to highlight each additional session, or ‘Shift’-click to highlight a range of sessions.
There are two pages:
We try to support all printers, but if you encounter problems printing the T.O.V.A. report, there is a workaround:
We hope that this works for you. However, please do send us a Tech Support request (section 27) to let us know about the problem, so we can correct this for you and other users.
After that, you can automate this workaround:
From then on, printing a report will save a temporary file, open your default PDF viewer, and print the report using your default printer/settings.
In order to administer a T.O.V.A. test and thus generate a T.O.V.A. report, you must have one or more test credits available on your T.O.V.A. USB device . A test credit is used when a test session is saved from the T.O.V.A. USB device .
The T.O.V.A. USB device holds only one test’s data, and the test data can only be saved by using a test credit. If you run out of credits, you cannot continue administering tests until you order more. A new T.O.V.A. USB device will contain five test credits, and, therefore, you can administer five tests before you need to order more credits, though you can order more at any time.
Ordering more test credits is easy. How you order will likely depend on if your T.O.V.A. system can connect to the internet.
With an internet connection, ordering credits is easy:
Once the transaction is complete, your organization will be billed for your order as previously authorized. If you have questions about billing or pricing, contact T.O.V.A. customer service (see section 27 for details.)
In the T.O.V.A. 9.0, credit ordering is a simple exchange of codes. This exchange is performed automatically if your T.O.V.A. system is connected to the internet. If it is not, you can exchange codes with the T.O.V.A. office by means of email or phone.
If your T.O.V.A. system cannot connect to the internet, you will see the Offline Ordering window (Figure 43). At the top, a frame contains ‘Your information’; this is the information that you will send to The TOVA Company when you are ordering credits (or receiving a service order).
As noted, you can contact The TOVA Company in a variety of ways with your ordering code(s), and we will respond with your authorization code(s). Once you’ve entered the authorization codes successfully, choose ‘OK’.
Sometimes you may order credits over the phone or email. If that credit order is initiated by The TOVA Company instead of your T.O.V.A. system, we call that a service order. In that scenario, we will send you a service order authorization code, and you will enter it on this same window. When you click ’OK’, the code will process, and a new ordering code will appear under ‘Your information’. It’s important that you send that information back to us, via any of those same means (phone, email, website). That will complete the transaction on the server, so that you will still be able to order credits in the future.
Once the transaction is complete, your organization will then be billed for your order. If you have questions about billing or pricing, contact T.O.V.A. customer service (see section 27 for details.)
Some users do not order credits directly through the application in the standard way. Instead, they contact us, and we generate a service order.
In order to receive credits from a service order, you must either have Internet access to your T.O.V.A. computer or receive a service code from us. In the latest version, the T.O.V.A. software will synchronize orders between the T.O.V.A. USB device and the T.O.V.A. server automatically. If that fails, you can attempt to sync manually:
If your system is connected to the Internet, your device will communicate with our servers, completing the order, and a message should appear with your new total credits available. If your computer is not connected to the Internet, the Offline Ordering window (section 20.2) will instead appear, where you can manually enter the service code(s) received from us. If there is any ordering code to be sent back, it will appear here under ‘Your information’. You should send that ordering code back to us, via any of the means listed (phone, email, website). This will complete the order on the T.O.V.A. credit servers, synchronizing it with your T.O.V.A. USB device .
For more information, contact T.O.V.A. customer service (see section 27.)
If you encounter a problem with the ordering system, tech support may send you to this Advanced window. This displays your device’s information, including all of your device’s ordering keys. That information can be sent to us via email from a separate online computer or, if necessary, read out over the phone.
If you do encounter a problem with ordering, there’s no need to panic. This window has all the information from your device that T.O.V.A. technical support should need to clear up the situation.
The T.O.V.A. 9.0 maintains all of your subjects’ test session data in a database, and it’s critical that you back up your T.O.V.A. data.
The T.O.V.A. 8.2 added a new backup feature to simplify backing up your database.
The T.O.V.A. will begin exporting all the sessions in your database to a T.O.V.A. data file at the chosen location. To restore from backup, simply import the .tova file as you would any other T.O.V.A. export file (see section 22 for more information).
Note: If you are using a “Separate" database configuration–separate databases for each user on the PC–you will need to back up each user’s database separately.
The T.O.V.A. 8.2 added an automatic database backup feature. By default, this backs up your database every 30 days. See section 25.5 for details.
The T.O.V.A. 9.0 can automatically and securely back up your database to The TOVA Company’s servers. This is independent of the automatic local backups, and it can upload test sessions as soon as they are saved or modified. This feature is experimental, and we still recommend you employ other backup solutions as well. See section 21.3 for options.
You can also use your PC’s own backup software to backup the database folder. There are too many different backup solutions for us to detail them here. What we can tell you is what to back up:
The path listed here (under the selected database type) is where your database is stored. You will want to back up the entire contents of this path.
Note: If your database type is ‘Separate’, each user on this system will have their own database. Therefore, you will need to back up each of these databases to secure your data.
This does not backup the T.O.V.A. application itself. If your hard drive fails and you have to rebuild your computer, simply re-install the T.O.V.A. . At the end of your install, the Configuration wizard will run (or you can run it manually). Again, note the selected database path: that is where you will restore the data you saved.
And if you have specific questions about backing up your T.O.V.A. data, T.O.V.A. technical support (section 27) is happy to help! Please call us before you lose your data.
The T.O.V.A. 9.0 can import T.O.V.A. 7 data files, as well as T.O.V.A. files exported from other databases (See Exporting, section 23) and T.O.V.A. backup files. Here’s how you do it:
The Import interface handles the potentially complex process of importing T.O.V.A. 7 files. At the bottom of the window is the ‘Start/Pause’ button, which starts or pauses the import, and the ‘Cancel/Close’ button, which aborts an import in progress and closes the Import window when importing is complete.
The window is divided up into four tabs. We’ll discuss each of these now.
This is the first tab (Figure 45), where you will see the list of all the files waiting to be imported. Click ‘Add’ to browse and select more files to import and ‘Remove’ if you decide you don’t want to import certain files after all. As files are imported, they are removed from this list, and the progress bar at the top will show you how far along the import process is, as well as the status. You can also click ‘Advanced’ to specify values for custom fields.
Here is where you can specify values for custom subject/session fields you may have created. Let’s say, for instance, that your organization has three offices: Northwest, Southeast, and Central. It’s important to you that you track which tests were administered where, so you created a custom session field named ‘Office’. Unfortunately, you have lots of T.O.V.A. 7 data for each of these offices. In this case, you select all the T.O.V.A. 7 files from the Northwest office and add them to your import list. Then you click on ‘Advanced’, add the ‘Office’ field, and specify a value of ‘Northwest’. Now you start the import, and all of the tests you import will have that ‘Office’ field set to ‘Northwest’. Once that import is done, remove the custom field value, add a new value ‘Office=’Southeast’, click ‘Close’ and import the Southeast batch of files. Once your files have all been imported, you’ll be able to sort the main window by the ‘Office’ field to easily find the subjects and sessions you’re looking for.
For more information on custom subject and session fields, see section 25.3.
The T.O.V.A. 7 used interpretation credits, so that after you finished a test you would need to “interpret” (“analyze” or “score” in older versions) the data to see the report or even the raw data. T.O.V.A. 7 files that were never interpreted contain “uncredited” data.
The Resolve Uncredited Files tab lists all these and gives you the chance to either credit the tests and import them or reject them for import.
Note: Importing an uncredited file will use a T.O.V.A. 9.0 test credit. Unless you use a test credit, you cannot import the file.
Note: Crediting a T.O.V.A. 7 file for import will add the test data to the T.O.V.A. 9.0 database, but it will not modify the original, uninterpreted data file. The original T.O.V.A. 7 data file will remain uninterpreted. If you then gave that same T.O.V.A. 7 file to a colleague, they would need to use another test credit to import it there.
In that scenario, you should credit and import the T.O.V.A. 7 data file, then export the session as a T.O.V.A. file. T.O.V.A. files always contain credited data. For more information about Exporting, see section 23.
The T.O.V.A. 9.0 groups all sessions by the subject to whom they were administered. When a T.O.V.A. file is imported, we will check to see if that subject already exists in the database. Sometimes we’ll find the subject and match it automatically, but sometimes the information almost, but not quite, matches up. When the import comes to one of these, it will be added to the Resolve Duplicate Subjects tab, and the tab label displays the number of potentially-matched imports.
In the example shown in Figure 48, we see that the last name, birthdate, and subject number are identical, but the first name is different. Maybe there was a typo entering this subject’s name. Maybe you have a subject that sometimes goes by ‘John’ and sometimes by ‘Johnny’ or ‘Jack’.
This tab gives you the opportunity to decide if a subject should be matched, whether the imported subject information should replace the information in the database, or if the imported subject is a different subject entirely.
The Errors and Warnings tab gives details on any problems that may have been encountered during import. The ‘Errors’ list tells the reason for any files that have failed to import. The ‘Warnings’ list shows where there may have been problems importing a file, but they were not critical, and the T.O.V.A. 9.0 was still able to import it. Any warnings will be added to that session’s Import Log in the database.
Use ‘Copy Messages’ to copy the information to your clipboard or ‘Save Messages’ to save it out to a file.
The T.O.V.A. 9.0 stores your subjects and test data in a database, but if you need to send data to colleagues or technical support, your T.O.V.A. test sessions can be exported.
Note: You cannot export subjects that don’t have any assigned sessions.
The process is simple:
Your T.O.V.A. data has now been exported to a file.
Note: If you select a lot of sessions, this could take a while, and the T.O.V.A. file could become large. By default, though, exports are ZIP-compressed.
Note: Exporting sessions does not remove them from the database.
Let’s briefly look over what options we have for exporting T.O.V.A. data.
Note: You cannot import PDF reports back into the T.O.V.A. 9.0. Only the T.O.V.A. file export can be imported.
For more information on Custom Subject/Session Fields, see section 25.3.
For more information on protecting personal health information, see section 24.
If a colleague sends you a .tova file, you can double-click on the file to open it in the T.O.V.A. .
When you do, you can choose to view reports of the sessions contained in the file and/or import them into your T.O.V.A. database.
The Health Insurance Portability and Accountability Act (HIPAA) has had far-reaching consequences, as we’re certain you know. We’ve designed some features of the T.O.V.A. 9.0 to help you fit the T.O.V.A. 9.0 into your HIPAA-compliance procedures.
The T.O.V.A. 9.0 has only limited built-in security. Instead, the T.O.V.A. 9.0 assumes that your organization has standard physical and computer security measures in place that meet HIPAA requirements. A T.O.V.A. 9.0 on such a computer should be protected enough for HIPAA compliance.
And as always, if you need more information, please contact T.O.V.A. technical support (section 27), and we’d be happy to help you with your HIPAA needs.
The Preferences window is where all the T.O.V.A. settings are managed. Choose the category you are looking for on the left and the settings for that category will be displayed. Choose ‘Save’ when you’ve finished making your changes.
Some T.O.V.A. settings require Admin privileges to change. Even if your login is an Administrator on the system, the T.O.V.A. application may run without Admin privileges (this is the default behavior in Windows).
These restricted preferences can only be modified from ‘T.O.V.A. Admin Settings’ (section 34.7).
Note: Some preferences that can be modified in the T.O.V.A. application are not accessible in T.O.V.A. Admin settings.
All T.O.V.A. System preferences (as opposed to Admin preferences) should be fully accessible to all T.O.V.A. users. If the T.O.V.A. is unable to write to files in the shared TOVA folder, you may be prompted to let the T.O.V.A. application fix the problem.
If you encounter this error (Figure 52) and you have Administrator access to your Windows PC, click ‘OK’ and grant the T.O.V.A. access to make changes to your PC.
Mac users: This built-in function is currently only available for Windows. If the T.O.V.A. reports “Your system preferences couldn’t be saved.”, there’s a script on your T.O.V.A. CD or flash drive that can correct the problem:
Please contact T.O.V.A. technical support if you continue to have permissions issues (section 27).
The T.O.V.A. 9.0 allows you to add your own fields to the T.O.V.A. database and display the information on reports and the main window. This can be of particular use to researchers.
In the Preferences window, you can ‘Add’ new custom fields, select and ‘Edit’ them, or ‘Remove’ fields you no longer want. Custom fields can be flagged as containing Protected Health Information, in which case they will be removed or hidden along with Subject Name when appropriate (see section 24 for more information on PHI).
There are two kinds of custom fields: subject and session. Subject fields follow the subject through all of their sessions, whereas session fields apply to a specific T.O.V.A. test session. Let’s say you’re doing a study of how “Hair length" affects attention and impulsivity. While length of hair applies to a subject, it could easily vary between sessions. The first time you test Tina Anderson, she may have long, flowing hair, but by the time you test her again, she may have cut it short. Therefore, you should add “Hair length" as a session field, not a subject field. Conversely, “Eye color" should be a subject field as it is unlikely to change over the course of one’s life.
By default, custom fields will not appear on the main window or report. To add them to the main window, see Subject/Session Table fields, section 25.8. To add them to the report, see Customizing the Report, section 19.1.
Note: Some of these settings are Admin preferences (section 25.1).
The T.O.V.A. 9.0 stores all of your T.O.V.A. test sessions in a database. There are two database configurations you can choose from:
See section 34.4 for more information on changing your database path.
Note: These are mostly Admin preferences (see section 25.1).
We have always encouraged users to back up their T.O.V.A. database themselves (and continue to do so), but now you have new backup options:
You can also click ‘Back up database to the TOVA server now’, and a full backup of your entire database will be uploaded to The TOVA Company server.
A field is designated as a ‘legacy field’ if it is no longer being added or edited for new or existing subjects or sessions, but it is kept around for historical purposes. For instance, ‘Height’ and ‘Weight’ were fields in the T.O.V.A. 7, but are not used in the T.O.V.A. 9.0. When you import T.O.V.A. 7 files, height and weight data will be imported as well, but you cannot edit these fields.
If you decide you want to be able to add or edit Height or Weight in the T.O.V.A. 9.0, you should de-select these as Legacy fields. Conversely, if your colleague shares a T.O.V.A. 9.0 export file with you that contains a ‘Hair length’ field, you may wish to designate that a legacy field, so that it will not appear as a field the next time you start a new session.
Logging is a very useful tech support tool for the T.O.V.A. 9.0. By default, the log will record in a file all error messages you may encounter in the T.O.V.A. . By adjusting the settings, you can record more or less information, or none at all, if you choose.
You can specify what information should be logged (by importance/severity), where your T.O.V.A. log file will be stored, and how logging will be performed. Generally, T.O.V.A. users will not want or need to modify these settings from their defaults unless asked to do so by T.O.V.A. technical support.
The T.O.V.A. 9.0 log, as well as other relevant system information, can be sent to T.O.V.A. technical support through our support request feature (section 27). The TOVA Company will not collect any information from your system without your consent.
With the Subject and Session Table preferences you can select which fields will or will not appear on the main window Subject and Session tables. The Subject table can display any or all of the default Subject fields, as well as any custom Subject fields. The Session table, likewise, can contain all of the default and custom Session fields, as well as all the Subject fields. Select the fields you want to see when browsing subjects and sessions and keep unnecessary information from cluttering your interface.
Note: Even if a private field is added, it will not appear if PHI is hidden (see section 25.11).
Note: Some of these settings are Admin preferences. You may need to run ‘T.O.V.A. Admin Settings’ (see section 25.1) to modify them.
This is our grab bag of system preferences that didn’t belong elsewhere. You would do best to ignore this section until and unless you actually need it.
Note: By default, ‘Subject number’ is considered a “legacy field”. It will not be available for editing until you deselect it under Legacy fields (section 25.6).
Note: This is an Admin preference (see section 25.1).
If there are users on your system whom you don’t want accessing the T.O.V.A. , here you can set a password for the app. This is a system-wide password and, of course, may only be set or removed by an administrator.
Note: This password only controls access to the T.O.V.A. 9.0 application. Securing your T.O.V.A. data is a function of your operation system, through user-access levels and file/directory permissions, and while the T.O.V.A. accommodates this, the T.O.V.A. software does not itself encrypt or restrict your data.
Note: Some of these settings are Admin preferences (section 25.1).
If you are using the main window (where you browse subject information) in view of your subjects, you may want to hide Protected Health Information from view. Choosing ‘Hide Protected Health Information’ will leave Subject Name and other protected fields off of the main window and reports.
There is also an option here to ‘Display no subjects or sessions on startup and blank search’. Essentially, this means that until you search for something specific, the main window will display no subjects or sessions, instead of every subject and session, which is the default behavior. In addition to not revealing PHI, this makes starting up the T.O.V.A. faster, especially if you have a lot of subjects in your database.
See section 24 for more information on protecting Personal Health Information.
Your session launch options determine which session type will be launched and how. You can modify these session launch options in the Preferences window (section 25) or for a single session by clicking ‘Options’ in the ‘New Test Session’ window (see section 18.4.2);
You will always launch a T.O.V.A. session the same way, by creating a new session and clicking the ‘Launch’ button. The first option here is to choose what type of session you will launch.
If this is an EAV test session, launching a session will immediately bring up the EAV session screen. Launching a PTE session, on the other hand, requires rebooting your computer.
If you choose to test with the PTE, there are several mechanisms for doing it:
(Mac only) If your Mac fails to boot to the PTE, you may hold the ’C’ key during the startup process to force using the CD, or the ’Option’ key to see a menu of all bootable devices, like the T.O.V.A. CD or flash drive. The T.O.V.A. boot media may show up in the list as ’Windows’ due to how the drive is formatted. Using the keyboard is required on OS X 10.11.
To launch a PTE session, you will always need to reboot your system. This will happen automatically when you click ‘Launch’. But if you select ‘Reboot later’, the T.O.V.A. will exit but not reboot, so you can reboot your system yourself later.
These are the settings the T.O.V.A. will use to size the stimuli, as well as simple volume adjustments for the auditory stimuli. The visual T.O.V.A. ’s stimuli are two easily discriminated geometric figures centered on the computer screen (Figure 62).
The visual T.O.V.A. was normed using stimuli under the following conditions:
These are the recommended conditions; however, monitor size, type (standard or widescreen), resolution, and distance from the subject’s eyes may vary. Target size is important for the following reasons:
Most computer configurations are well within these parameters. However, some laptops, LCD monitors, or other widescreen displays may not have the capability to “expand” the T.O.V.A. ’s smaller VGA testing screen resolution to an appropriate size. This can result in a “miniature screen” in the middle of a larger monitor, and the stimuli are subsequently very small on the screen. To address situations such as this, the T.O.V.A. software has these scale adjustment settings.
It is recommended that you closely approximate the three-inches-diagonal measurement. If the adjustments here are not sufficient to display the stimuli properly, we recommend that a different monitor be used for T.O.V.A. testing.
Stimuli for the auditory T.O.V.A. are two easily discriminated audible tones: the target is G above middle C, and the nontarget is middle C, played though external speakers placed on either side of the display. Since the T.O.V.A. should always be administered in a quiet location, free from distraction (it is a test of attention) the volume need only be adjusted to a comfortable level.
The very first setting on this panel we will mention last. ‘Auditory calibration’ was added in T.O.V.A. v.8.1, and it is used to adjust test timing to the slight delay (about 3.5 ms) that occurs when using USB speakers. If you are directed by technical support to use USB speakers, we will give you the appropriate value to be entered here. If you are not using USB speakers, this value should be left alone.
Here is where you can change the default settings for the T.O.V.A. multimedia test instructions (see section 33 for more information).
If you just need to change these settings temporarily for the session you’re about to give, click ‘Instructions language’ from the New Test Session window (section 18.4).
Note: This is an Admin preference (see section 25.1).
All T.O.V.A. customers are entitled to free software upgrades. Now we can send you updates automatically when we fix bugs or add new features. Here, you can modify your update settings.
Note: While you may or may not elect to download T.O.V.A. updates automatically, we never install an update without asking permission.
Note: Some of these settings are Admin preferences (section 25.1).
Note: This setting only appears on Windows systems.
Most Windows systems that test with the PTE (section 30) use the “Automatic" method, so they don’t require a boot CD or flash drive for testing. This employs the T.O.V.A. PTE Activation service (section 36.6) to boot the PTE.
In the Windows service preferences, you can disable the T.O.V.A. service. This may cause the T.O.V.A. to regularly prompt you for permissions, so please see section 36.6.2 for more information.
The other setting available here is the T.O.V.A. PTE Activation Service port. Please don’t change this setting unless instructed by T.O.V.A. technical support! Very few people will have trouble communicating with the T.O.V.A. service on this port; if you do, it can be modified here, but it must be also modified in tova-pte-svc.ini. See section 36.6 for more details on the T.O.V.A. PTE Activation service.
One major addition in the T.O.V.A. 8.2 was the Status window. This window is available from the main window by clicking the ‘Status’ button. The purpose of this window is to alert you to possible problems with the T.O.V.A. and provide simple solutions.
To help in identifying problems, the Status window uses condition colors:
If the ‘Status’ button on the main window is green, everything should be working. If it’s yellow or red, click the button for more specific status information and solutions.
Each category pane has several standard options:
In addition to these, status panes often have other buttons available.
Here is where you can see when your T.O.V.A. database was last automatically backed up. Click ‘Preferences’ to change your automatic backup options (see section 25.5 for more information on new backup features).
This pane of the Status window can tell you if you are low on credits or if there is session data that should be saved. The category will be unavailable (black) if there is no device attached. See section 20.
Notifications are a way The TOVA Company can contact you about account support issues. Accounts are linked to T.O.V.A. USB devices, so to receive notifications you must have Internet access and a T.O.V.A. USB device attached. You can delete messages once you have addressed them.
This pane will warn you if your last booted PTE version is out-of-date. This usually indicates you need an updated boot CD (section 31.5.4) or flash drive (section 31.5.6). See section 31 for more information about the PTE.
(Windows only)
The T.O.V.A. Windows service provides access to system functions, such as modifying system boot settings and installing software updates, that are not accessible to all users. This pane communicates any problems with the service and provides options such as restarting the T.O.V.A. service or opening the Windows service console. See section 36.6.
This pane will alert you to an available software update or tell you if a previous update failed. See section 28.
The TOVA Company is committed to helping our customers however we can to use the T.O.V.A. . That’s why, with the T.O.V.A. 9.0, you can ask for help right from the T.O.V.A. application. The Help window (click ‘Help’ from the main window) contains three buttons to contact the TOVA Company:
And you can still always contact us by phone (1.800.PAY.ATTN or 562.594.7700), email (info@tovatest.com), or fax (800.452.6919 or 562.594.7770) instead.
In Figure 67, we see the Contact Technical Support window. We’ll use it as our example; it has the most features of the three contact operations.
These four fields tell us how to reach you with the support you require. Your ‘Serial Number’ will be read automatically from your device if it’s attached. Information entered into these fields will be remembered and filled in should you contact us again.
This is where you can ask your questions or give us information about technical issues. It’s okay to just leave the ‘Attention’ field blank, but if you’re working with a specific technical support representative, add their name here to make sure the information goes to the right person.
This is an important one. When this is checked, we will collect information from your system that may help us resolve the issues. Specifically, we send these:
All of this information is technical and can often help us answer your questions and resolve technical issues. There’s a lot of information, and on some systems it may take a minute or two to collect and upload. If you would prefer not to send us any of this information about your system, uncheck this box, and the request will include only the essential information: the serial number of your T.O.V.A. device, the operating system you’re running on, and your T.O.V.A. software version. And contact us if you’d like to more details about the information collected.
If you have questions for technical or interpretation support about specific subjects or sessions, you can attach them here. When you click the ‘Attach sessions’ button, you will be shown a list of subjects and sessions, along with a search bar, similar to the main window. Click to highlight the subject or session you want to attach (selecting a subject will attach all of their sessions). To select more than one, use ‘Ctrl’-click (Mac users, ‘Command’-click) to highlight each additional, or ‘Shift’-click to highlight a range.
Notice the checkbox at the bottom of Figure 68, ‘Remove protected health information’. This is selected by default and will strip out of subjects or sessions you attach any information that would personally identify the subject. In rare instances where a question is specific to that personal information, you may uncheck this box. For more information on protecting personal health information, see section 24.
Click ‘Attach Selections’ to include those selected subjects and sessions or ‘Clear Selections’ if you decide not to attach any. When you’re finished, the ‘Attach sessions’ button will display a green check to indicate sessions are attached.
Sometimes something may be happening on the screen that’s hard to describe to technical support. Click the ‘Screenshot’ button, and a small window appears (see Figure 69).
When you click the ‘Capture’ button, whatever’s showing on the screen beneath will be attached as an image to your support request. A thumbnail of that image will then display in the Screenshot window. If it doesn’t look right, arrange your windows and try another capture. If you can’t tell, resize the window to make the captured image larger. When you’re finished, click ‘OK’ and the ‘Screenshot’ button will now have a green check, indicating your request has the screenshot attached. You may instead click ‘Clear’ if you decided not to attach any screenshot.
Preview lets you see all the information and files you’ll be sending us when you click the ‘Send’ button. It’s not necessary, but it’s there for those curious or worried about privacy.
When you choose ‘Send’, all of the information you’ve selected will be collected together, compressed, and uploaded, through your internet connection, to us. This can be a lot of information, depending on your selections, so it may take a few minutes. When it’s finished, you should see a message stating simply, “Your contact request succeeded.”
If, however, your upload fails, you might try the next option.
If your system is not connected to the internet, or if you have problems uploading your contact request, choose ‘Save’ to collect and save all the information to a file. Then you can copy the file to another system and/or attach it to an email to support@tovatest.com.
You can guess what these buttons do.
Since software updates to the T.O.V.A. are free, we’ve worked to make keeping your T.O.V.A. up-to-date as easy as possible. When a new version of the T.O.V.A. is available, the T.O.V.A. will download it automatically.
Note: The T.O.V.A. will never update without your consent; you will always be prompted before an update is installed. However, you can disable automatic download of updates in the Preferences (section 25.15).
When there is a new update available, the ‘Status’ button on the main window will turn yellow.
Click the ‘Status’ button on the main window and then ‘Updates’, and you’ll see the Updates pane. This pane will tell you if your T.O.V.A. is up-to-date, if there’s a newer version available, and more. Some of these options may also appear:
Once the T.O.V.A. finishes downloading the latest version, click ‘Install software update’ button, and you’ll be next prompted to review the release notes and accept the updated license agreement, if any.
Note: Please save or erase any session on the T.O.V.A. USB device before updating the T.O.V.A. software. Software updates usually include a firmware update, and any session data on the device will be lost.
If you accept the agreement, the T.O.V.A. will exit and begin the update process. Once the update is complete, the T.O.V.A. will automatically start back up.
Some software updates may come with updates to the device or microswitch firmware, the software on your T.O.V.A. hardware. Yeah, the hardware has software, too.
When a firmware upgrade is available, the T.O.V.A. will prompt you to install it immediately (Figure 73). Though you can choose to ‘Continue Anyway’, the T.O.V.A. will prompt you pretty persistently. Firmware upgrades often involve fixes critical to testing, so we advise you to always install firmware upgrades. Click the ‘Install firmware’ button, and the firmware update will begin. It shouldn’t take more than two minutes. Note: Please don’t disconnect the T.O.V.A. USB device or try to administer a test during a firmware update.
When the firmware update is finished, you’re ready to administer more T.O.V.A. tests. If the firmware update fails, restart the T.O.V.A. application, reattach the T.O.V.A. USB device , and let it try again. The T.O.V.A. USB device must have valid firmware compatible with the software.
Usually an update to the T.O.V.A. means an update to the PTE, to increase compatibility with new hardware, add new features, and fix bugs. If you’re using a T.O.V.A. CD to boot the PTE on your system, you need to update that CD to run the latest PTE version. See section 31.5.4 for details on where to download the latest CD image and steps to update the CD in your OS.
Likewise, if you’re using a flash drive to boot the PTE instead, it also needs to be kept up-to-date. Contact T.O.V.A. technical support for assistance with that.
We try to anticipate every hardware and software configuration, but inevitably something will happen that causes the automatic update to fail.
When you return to the T.O.V.A. , if there were install errors, the T.O.V.A. will display the install log. You can send us that log, as well as other logs that track T.O.V.A. problems, by choosing ‘Send to tech support’. This can help us diagnose and fix these problems for you and other users. See section 27 for more information.
You can also click ‘Manual Update’ to try manually updating the T.O.V.A. . For more information, see section 34.3.
Reference |
This is the reference section, where we answer all the questions we didn’t answer in the rest of the manual. If you can’t find your answer here, don’t forget: you can always contact T.O.V.A. technical support (section 27).
This reference section deals with the T.O.V.A. 9.0 hardware, what it does, and how to diagnose hardware problems.
Not only does the T.O.V.A. USB device securely track your test credits, it’s also a miniature computer! Let’s look briefly at all that the T.O.V.A. USB device does when you administer a test:
Note: You must have a T.O.V.A. USB device to administer tests in the T.O.V.A. 9.0.
The light on the front of the T.O.V.A. USB device indicates to you and to us what the T.O.V.A. USB device is doing. It’s also a button you can press if you ever need to reset your T.O.V.A. USB device . It’s important to note, however, that the reset light can also be a distraction to your subjects, which is why we recommend that you keep it out of sight during testing. The microswitch has a nice long cable for just this reason, and the reset light is recessed somewhat to make obscuring it that much easier.
Here are the colors you might expect to see using the T.O.V.A. :
| Color | Status | Description |
| Yellow | Powered | Device is finding power, but is not recognized by your OS.* |
| Green | Ready | Device is attached and recognized by your OS. |
| Blue | Testing | Device is running the T.O.V.A. test. If the device is disconnected or loses power while the light is blue, your test data will be lost. |
| Red | Error | An error prevents testing (e.g., microswitch unplugged). The red light may blink to indicate a specific error. |
| White | Switch down | The microswitch is being pressed (It doesn’t turn white during testing, to avoid distraction). |
* Note: A yellow light may indicate you haven’t installed the T.O.V.A. USB device drivers. You should install the T.O.V.A. software before you setup the hardware. See section 9.12 for information on installing the T.O.V.A. .
To use the T.O.V.A. 9.0 software, you will need T.O.V.A. 9 hardware. You cannot administer the T.O.V.A. test with T.O.V.A. 7 or T.O.V.A. 8 hardware. Please contact T.O.V.A. Customer Service (section 27) to purchase a T.O.V.A. 9.0 kit before installing the T.O.V.A. 9.0 software.
If the T.O.V.A. does not recognize that your T.O.V.A. USB device is attached, try the following:
Sometimes there can be communication problems with the T.O.V.A. USB device . There are two common causes of this:
If the above doesn’t resolve the problem, try the “Device not found" steps at section 29.1.3. If it continues to happen, there may be a problem with your PC or your T.O.V.A. hardware–contact T.O.V.A. technical support for help (section 27).
If ever your screen will not show the correct picture or your speakers are making a sound they shouldn’t be, you can reset the T.O.V.A. USB device by pressing the button (that little light) on the front. That will return audio and video control to your system. If you’re still having audio or video problems then, it’s probably not the T.O.V.A. USB device causing them.
Note: You should also make sure that the USB cable is properly attached, as that power is needed to carry the audio and video signals.
Note: These instructions are for Windows. If you encounter problems installing the T.O.V.A. USB device drivers, you may need to manually install the hardware. For instance, if the T.O.V.A. hardware was attached before the T.O.V.A. software was installed, you could encounter a scenario where the drivers do not install correctly. This is a Windows glitch, but fortunately it can solved:
select the ftdi folder, and choose ‘OK’. Click ‘Next’.
Congratulations! You’ve successfully fixed a driver installation problem.
Instead of mice or keyboards (both unpredictably inaccurate), the T.O.V.A. uses a standardized microswitch which performs reliably and consistently across literally millions of presses. The T.O.V.A. 9.0 microswitch has a built-in light sensor that we use to calibrate your display. For more information on calibration, see section 18.5.1.
To connect the new microswitch to the T.O.V.A. USB device , line up the arrows on the top of the connector with the top of the T.O.V.A. device and push it gently into the port. You do not need to twist or turn or squeeze in any way.
To disconnect the microswitch from the T.O.V.A. USB device , grasp the connector on either side and pull it gently but firmly out from the device. Again, you do not need to twist or turn or squeeze the connector in any way.
First, make sure that the microswitch is plugged into the front of the T.O.V.A. USB device . If it’s not, or there’s another microswitch error, the light on the front of the T.O.V.A. USB device may be red.
Second, make sure the microswitch ‘feels’ right. With a gentle press, it should make a sudden transition to the pressed state with a single click. If it feels mushy, or very hard to press, or something is rattling in the case, you’re going to need a new microswitch.
Third, go to ‘Help’, ‘Check T.O.V.A. hardware’, ‘Check microswitch’ to test your microswitch button. If there is or was a microswitch error, it may be indicated on this window as well. See section 29.3 for more information.
Finally, if the microswitch intermittently works and then doesn’t, it should be replaced IMMEDIATELY; a test taken with a faulty microswitch can’t be considered reliable.
If you need a new microswitch, contact T.O.V.A. customer service (section 27) as soon as possible and let us know how fast you need a new one. We’ll send you a new one right away! Note: We might ask you to send us the old one for quality control purposes.
The Check Hardware window has information and tools for testing and fixing the T.O.V.A. USB device , the microswitch, and your system’s connections to them. Let’s review them briefly:
On the right side of the Check T.O.V.A. hardware window you are given all the information about your T.O.V.A. hardware.
Below these are more advanced functions. Note: You should not use these without direction from T.O.V.A. technical support.
You must calibrate your display to administer the Visual T.O.V.A. test. Whether it’s a modern LCD display or a big, old CRT monitor, every display has some delay, however brief. Calibration allows the T.O.V.A. to properly account for your display’s specific timing, so that the results of the T.O.V.A. will be as precise and accurate as possible.
Most displays will calibrate successfully. However, others may encounter errors during calibration.
The first thing you should do if your calibration fails is try it again. Make sure that you’re holding the microswitch so that the bottom of the microswitch (where the photodiode window is) is directly touching the surface of your screen, but not pressing down hard. The button should be facing outward from the screen and the cord should be hanging down from the back of the microswitch, as indicated on the calibration diagram (Figure 89). Calibration may take a minute or so, but try to hold the microswitch still.
Secondly, some displays may take a few minutes to finish warming up. Restart the calibration and leave the message “Place microswitch in box and press button” on the screen for at least two minutes before starting a second time.
Thirdly, your display may be too dim, and you should increase the brightness and try calibration again. Once calibration is complete, you can lower the brightness again as appropriate.
If you continue to get the same error, the problem can be diagnosed here:
Once you get a successful calibration, you should be good to administer the test, and you won’t need to recalibrate every time. If you replace your system’s monitor or video card, however, you should always recalibrate the T.O.V.A. to the new display hardware.
If you continue to receive errors, your display may not be capable of accurately administering the T.O.V.A. test. The T.O.V.A. 9.0 will not administer the T.O.V.A. Visual test on a display unless it can be successfully calibrated. Please contact T.O.V.A. technical support (see section 27), so we can get more information about your monitor and recommend other models that will work better.
Audio is an important part of the T.O.V.A. . The T.O.V.A. test instructions are spoken by your PC. The auditory T.O.V.A. test complements the visual test by measuring attention differently. As a result, we want the T.O.V.A. to work with your system’s audio hardware. Are your test instructions too loud and your auditory test too quiet, or vice versa? If you’re having sound problems with the T.O.V.A. , we can help you fix that.
The PTE and EAV tests each have their own volume settings. The sections to follow can help you address volume problems in each testing environment, but first a couple of general audio tips.
The easiest way to control volume is by raising or lowering the volume on your external speakers. However, if you have no external speakers–a laptop with a basic PTE hardware setup (section 13.1), for instance—you can skip to the next section.
If you can’t hear the Auditory test or the test instructions, check your speakers first: Are they plugged in, turned on, and turned all the way up?
The test instructions are accompanied by audio by default. Press the space bar to pause or restart the instruction audio and the ‘S’ key to turn the audio on (or off) while the instructions are playing. Note: With the instruction audio off, the instructions must be advanced manually, using the right arrow key.
For audio problems in the PTE, use the PTE volume controls. From the main PTE menu, press ↑ to raise the volume one step and ↓ to lower it. Each time a brief audio clip will be played, and a number will be displayed. The volume level you choose will be stored when you return to your OS and preserved for your next PTE session.
Note: These volume controls are only available from the main PTE screen and not during the T.O.V.A. test or the Test Instructions.
A Note on the Auditory Test: If the target (higher) tone is significantly louder than the nontarget (lower) tone, the problem is the bass response of your speakers. This can often be an issue with laptops, and you will need to use different speakers to resolve this. Contact T.O.V.A. customer service for recommendations.
If your sound works fine in your OS but does not work in the PTE, the PTE may not be selecting the correct audio hardware. You may see an audio error or the speaker button at the bottom of the main PTE menu will be disabled. Click the wrench button (or press ‘A’) and then choose ‘[C]hange audio device’. This will present a menu of all of the audio devices the PTE can detect.
Select a device, even if there is only one listed, and an audio clip should play at the current volume to test out the device. If the audio played correctly, great! Resume your PTE test session or click ‘Done’ to return to your OS. Your device selection will be preserved.
If you get an error after choosing the audio device, go back to ‘Change audio device’ again and select a different audio device, if any. If you try all the devices here and no audio plays, your audio hardware may be incompatible with the PTE. If this is your situation, please send your PTE Hardware Information to T.O.V.A. tech support immediately—we are doing our best to make the T.O.V.A. PTE work for every sound card, and information from your system can help us do that. See section 34.1 for more information.
Note: Please use this screen carefully, preferably on the advice of T.O.V.A. technical support. The main PTE volume and mixer defaults will work best for most systems, so if it ain’t broke, don’t fix it.
While the T.O.V.A. PTE has gotten increasingly proficient at recognizing hardware and adjusting settings to the right default levels, some PCs may still need additional tweaks. If your audio is too quiet, too loud, or distorted somehow, and the main PTE volume can’t correct the problem, the latest PTE version has an audio mixer that might help you.
Click the wrench button at the bottom of the main PTE menu (or press ‘A’) and then choose ‘[A]djust audio levels’. Here you will be able to see and adjust all the channels for your PC’s audio device. The bar indicates the volume level, and the box next to it whether the channel is turned on or off.
Please note that this screen is not about selecting a specific channel to be used by the T.O.V.A. , but rather the audio levels contributing to the sound in the T.O.V.A. . Some may be best turned off, and some may have no effect whatsoever. We are happy to help you find the settings that will work best for your system.
USB speakers plug into a USB port just like the T.O.V.A. USB device, instead of plugging into your audio speaker jack. We sometimes recommend these for PTE audio problems because they are almost guaranteed to work with the PTE—other speakers may or may not. Please only use the USB speaker models recommended by T.O.V.A. customer service, and make sure to set the audio calibration value provided for your speakers.
Note: The External A/V test requires external speakers plugged into your T.O.V.A. USB device . If you have a laptop with no external speakers, for instance, you cannot run the External A/V test.
During an EAV session, your computer can play audio instructing the subject in taking the T.O.V.A. test. However, during an EAV Auditory test, the T.O.V.A. USB device will play the tones. Therefore you have two different audio sources (your computer, the T.O.V.A. USB device ). You also have multiple volume controls: your OS’s volume (which may have more than one control), the T.O.V.A. USB device ’s volume, and your speakers’ volume. Here are steps you can follow that will solve most EAV audio problems:
We have noticed that sometimes you can hear noise with the EAV setup that you don’t hear if the speakers are plugged directly into your PC. We’ve found this is specifically the case with some laptops—that’s because the laptop is actually producing the noise.
While the T.O.V.A. USB device may not be producing this noise, it might be amplifying it. Fortunately, the static or whine should go away during Auditory testing, when the PC sound is cut off. If you find that it does not, try different speakers or contact T.O.V.A. tech support.
In the T.O.V.A. 9.0, there are two ways of administering a T.O.V.A. test session: PTE and EAV. When you configure your T.O.V.A. software during install (section 12, you must choose one or the other.
Both session types administer the same T.O.V.A. test, giving you the same precise, accurate test results. Both provide multimedia test instructions to prepare your subject for the T.O.V.A. test. Both require you to calibrate your display once before you can administer your first test. The only question is which session type works best for your system:
| PTE Setup | External Audio/Video (EAV) Setup | ||
| • | For laptops without an external monitor or speakers | • | Best for desktop PCs or laptops connected to an external monitor and speakers |
| • | The simplest hardware setup | • | Requires a few additional connections |
| • | Requires that you reboot your system to the PTE (Precision Test Environment) to run a T.O.V.A. session | • | Allows you to test in your OS (Windows, MacOS) without rebooting |
The PTE (Precision Test Environment) is a boot environment you can use to administer a T.O.V.A. test outside of the inconsistent timing of modern operating systems like Windows and Mac OS.
Note: Most new Windows 8 and 10 systems CANNOT boot the current PTE. For more information, please see section 36.1.
Administering a PTE session requires rebooting your computer to our PTE operating system. This can be a complex, technical operation behind-the-scenes (see section 31.4), but we’ve made it simple for you.
Note: For systems with an external monitor and speakers (usually desktop systems), the T.O.V.A. 9.0 can administer tests without rebooting. See section 32 for details.
To see how the PTE works or test any problems you could encounter without launching a new session, you should test the PTE. This is available at the end of the Hardware Setup wizard (section 14) or by choosing the ‘Help’ button on the main window. When you choose ‘Test PTE’, you will be presented with a window of options.
When you choose ‘OK’ your system will reboot to the PTE.
Note: Macs and some Windows systems may require using a boot CD or USB flash drive to launch the PTE. Follow the instructions given for your system or see section 31.5 for more assistance.
When testing the PTE, you should verify the following:
If Test PTE works successfully, you should be ready for PTE testing.
The PTE interface mimics the External A/V session interface.
At the top you will see the main subject/session information. You should be sure that this is correct, or you may be administering the wrong test!
Below that information is a column of five buttons, one for each of the five steps of administering a T.O.V.A. test. As you complete each step successfully, a green check will appear beside the button. If instead a yellow warning sign appears, that step did not finish successfully, and you may want to repeat it.
Note: This button only appears for visual testing. The auditory test does not require calibration.
Once calibration has completed successfully, a green check will appear next to the button. This indicates that the PTE has valid calibration data, and it should also appear automatically the next time you launch a PTE Visual Test session. If your monitor fails calibration, see section 29.4.
Note: Unless otherwise noted, special keys function only in the main PTE menu.
Note: This is a rather technical explanation, only for the geeky and curious.
The T.O.V.A. 9.0 Precision Test Environment PTE is a minimal Linux 3.0 system tuned for real-time response. It uses SDL, ALSA, the Speex audio codec, and other standard tools and libraries to present the T.O.V.A. test instructions and stimuli with guaranteed timing accuracy and precision, within a simplified interface.
Entering the PTE requires rebooting out of your normal operating system. If you’re using the Microsoft Windows operating system, then each time you launch a PTE test session we use Grub4DOS (a universal boot loader that’s a modified version of GNU GRUB) to boot the PTE and then ensure that Windows starts again on your next boot. On Windows, we add the PTE boot image as a boot option; when you reboot to the PTE we send a /bootsequence command to the Boot Configuration Data store, which temporarily changes your system’s boot display order, causing it to boot the PTE by default.
For our MacOS X customers, and for Windows customers who can’t boot the PTE automatically, we provide a bootable flash drive as an alternative. For more information about using the T.O.V.A. 9.0 flash drive, section 31.5.5.
Your T.O.V.A. CD not only allows you to install the T.O.V.A. and our fine manuals, it also acts as a boot CD. A boot CD is like the boot floppies of yesteryear; put the CD in your CD (or DVD) drive, restart your computer, and then your computer boots (starts up from) the CD instead of from your hard drive.
Why would you ever need this?
Note: Some systems do not have a CD drive–the T.O.V.A. flash drive is available for these systems to boot the PTE.
After your system restarts, the T.O.V.A. Boot CD menu (Figure 98) will appear. Wait for three seconds, and the PTE will automatically begin to load up.
Note: When you are finished testing in the PTE, you may need to remove the T.O.V.A. CD or flash drive to boot back to Windows.
What should you do if you never see the T.O.V.A. Boot CD menu and your system boots instead back to your OS? You have a couple of options, depending on your OS:
If you see the T.O.V.A. Boot CD menu but you never get past the screen in Figure 98, the PTE may be incompatible with your system’s video configuration. Please boot the CD again and choose “Log debugging information to the T.O.V.A. Device". When this has finished, reboot your system back to your OS. The T.O.V.A. will start up and ask to send your information to T.O.V.A. technical support. If you say yes, this will tell us what kind of hardware you have and what problems may be occurring with it, so that we may fix the PTE to work for systems like yours in the future.
Using your system’s boot device menu is similar to accessing your system’s BIOS, except the boot device menu does not make any change to your system’s settings. The upshot is that you will need to bring up this menu every time you boot to the PTE, but because you’re choosing a “one-time" boot option, you won’t have to remove the T.O.V.A. CD or flash drive to boot back to your OS.
The general steps are these:
Let’s explore these last two steps in detail.
When you launch a PTE session, pre-2015 Mac systems should always boot the T.O.V.A. CD or flash drive automatically. (This was a new feature in the T.O.V.A. 8.2.)
But if that fails, Mac users can simply hold down the ‘Option’ key while rebooting to bring up the boot device menu. The device may show up in the list as “Windows" due to how the volume is formatted.
Many Windows PCs use a similar method: Hold down the ‘F12’ or ‘Delete’ key while rebooting and the boot device menu will appear.
However, the trigger key that you use for this varies between manufacturers and models. When your system first powers on, and it shows the manufacturer’s logo, watch for a clue such as “‘Enter’ to choose a boot device" or “‘Esc’ for boot menu". If that message does not appear, the trigger key might be any of the following: ‘Delete’, ‘Esc’, ‘F1’, ‘F2’, ‘F10’, or ‘F12’.
If holding the key doesn’t work, you may instead need to hit the trigger key at just the right moment, usually right when the manufacturer’s logo first appears (e.g. “Dell", “HP", “Compaq", etc.). When Windows has finished shutting down, the screen will go black or display a message like “no signal". At that moment, start hitting the trigger key repeatedly.
If you see “Windows Boot Manager", you’re too late—you’ll need to reboot your system and try again. If you see “Starting Windows", wait for Windows to load and the T.O.V.A. to start up again, and then relaunch your T.O.V.A. session. If none of the tips above work—and you may have to try them more than once to be sure—you might need to ask your company or organization’s system support or contact your system’s manufacturer for more information on triggering your system’s boot device menu.
And you can always contact T.O.V.A. technical support (section 27) for assistance; we’ll help in any way we can.
Once the boot device menu appears (e.g., Figure 99 or Figure 100), stop hitting or holding the trigger key. If you are booting the T.O.V.A. CD, highlight your CD/DVD drive in the list (look for ‘CD’ or ‘DVD’ in the name), and press ‘Enter’. Likewise, if you are booting the T.O.V.A. flash drive, look for ‘USB’ or ‘Flash’ in the name.
Note: This section is for Windows PC users.
If you insert a T.O.V.A. CD into your CD-ROM drive and restart your system, the system should boot to the CD, meaning that it will try to load the T.O.V.A. Precision Test Environment instead of running Windows. If it does not, however, don’t panic! You probably just have a different boot configuration. We can probably change your system so that it will try to boot to the CD before the hard drive. It just means we’re going to have to change your BIOS settings. Okay, you can panic now.
Just kidding. The truth is that configuring your BIOS is pretty easy. Telling you how to configure your BIOS is virtually impossible. This is because almost every system does it differently, and only some of them give you helpful clues along the way. You may have to reboot your system two or three times before we figure it out. But we will figure it out.
It may help you in performing this task to imagine that you are a BIOS ninja. It sounds ridiculous, and it is. But to change your boot order, we will need to strike quickly and slip in and out without disturbing the environment, and most of all, adapt to the unexpected. That sounds like a ninja to us, but if it sounds like a platypus to you, hey, it’s your imagination.
This is the easy step, because you’ll always have to do this first. Unless your computer is currently off, in which case step one will be Turn your system on instead.
When you first reboot your system, you will likely see some kind of logo, and some information about your RAM or processor you probably usually ignore. You will hopefully also see something like “Press F10 to enter Setup” or “Hit DEL for BIOS”. If you don’t see it the first time, reboot your system and look again.
There is always a chance that there will not be any such helpful message. One of our test systems, for instance, does not. As it turns out, the key to press is ‘F1’, but we’ve seen quite a few others. If you have no message, try the following:
‘Delete’, ‘Esc’, ‘F1’, ‘F2’, ‘F10’, ‘F12’
Here’s where you’re gonna need those ninja-like reflexes. Whichever key it turns out to be, it will need to be pressed while that initial splash screen appears, which could be as long as twenty seconds or as short as one. Furthermore, even if you press the right key, it may not immediately respond. If none of those work, and you may have to try them more than once, you might need to contact your company or organizational system support, the tech support that came with your system, or you can always try T.O.V.A. technical support.
When you’ve successfully entered the BIOS Configuration program, you will most likely see a DOS-style application, without windows or a fancy GUI. Use your ninja powers of perception to examine your environment. There will probably be some basic directions somewhere on the screen telling you how to navigate the program. As with the last step, no two BIOS utilities are alike, so we can’t give you any specific instructions.
We can tell you roughly what you are looking for. You want to change the ‘Boot order’ or ‘Boot configuration’. Essentially, have your keen ninja senses open for the word “Boot”. You will probably not find it in the top level menu, so don’t be surprised if you have to check two or even three levels deep for the setting.
Note: You should be careful not to change anything else while you’re here, but every BIOS utility we have ever seen has a way to exit the BIOS without saving changes. If your ninja skills fail you, and you think you might have unintentionally changed a setting, Don’t panic! Slowly, carefully follow the instructions on the screen to exit the BIOS without saving. Then reboot your system and try again.
Eventually, hopefully, you will find a setting for something like ‘Boot Order’, ‘Boot Priority’, or ‘Boot Sequence’. This is your target! Again, we wish we could tell you specifically how to change this setting, but we can tell you what you are trying to do.
Every time your system reboots, it checks a sequence of devices, one after the other, looking for an operating system. Once it finds that operating system, it stops looking. Among these device may be: Floppy drive, more than one hard disk drive (HDD), USB drive, CD and/or DVD drive, and more. What we want to do is change this sequence so that before it checks your hard drive, it will check your CD drive. How all those other devices get prioritized is up to you.
Now that we’ve changed our boot order, we need to slip out of here unseen, without accidentally changing anything else. Examine the directions carefully, looking for a key that will let you ‘Save and Exit’ or ‘Save Changes’. You may be able to do this from this screen or you may have to return to the main menu. If you’ve changed the boot sequence and you haven’t touched anything else, save your changes and exit.
Now reboot your system with the T.O.V.A. CD in the drive and try again. This time it should boot to the T.O.V.A. PTE. Congratulations! Your mission is complete, and your honor is intact!
If it didn’t work, you may want to review the directions, as unhelpful as they are, and try again. Or you may want to call T.O.V.A. Ninja, er, we mean, technical support. Our highly-trained operators will be honored to serve you.
On a very few systems, we’ve found that giving the CD drive boot priority can cause the hard drive not to boot. The system checks for a CD and, if the CD is not there, assumes there’s nothing else to boot. In this case, you will want to reverse your changes above and use the instructions in the next section (section 31.5.2) for the boot device menu.
Note: To update your flash drive, see section 31.5.6.
If you are using a CD as a boot CD, it is critical that you update it every time you update the T.O.V.A. so that you’re using the latest version of the PTE. While we provide no automated way to do this on Windows, the T.O.V.A. 8 CD itself was a CD-RW and can be updated by most CD-RW drives and CD burning software. If you do not have a T.O.V.A. CD, you can burn the T.O.V.A. CD image to any blank CD-R.
The T.O.V.A. 8.2 for Mac added a script for downloading and burning the latest CD image all in one step.
The script will download the latest version of the CD image from our website and then burn it to the inserted CD. When it has finished, your CD is up-to-date, and you can use the CD to boot the PTE or reinstall that version of the TOVA software.
Downloading the latest install CD image is easy, but the image can be quite large, over 150 MB. Note: This can take awhile even on broadband connections.
Once you’ve downloaded the image, you need to burn it to a CD.
The ‘Update_CD’ script (section 31.5.4) will automatically download the latest T.O.V.A. CD image and burn it your blank or rewriteable CD. You can also use the Disk Utility to manually burn a CD if you prefer to use a GUI.
There is no standard way to burn a CD under Windows, so we are unable to provide thorough instructions. If you are uncomfortable with these directions, you may want to consult your tech support staff.
If that option is not available to you, choose to ‘Open’ the .iso in your CD burning software. Because different systems have different burning software, we cannot guide you through this; you will need to navigate your own software to burn the .iso image to the CD. Note: You do not want to just ‘add’ or ‘copy’ the .iso file to the CD. You want to burn the image to the disc.
The burning process should take only a few minutes. When it’s done, you’ll have a fresh new T.O.V.A. CD with the latest PTE.
The T.O.V.A. 9.0 flash drive is included with your T.O.V.A. 9.0 kit. It’s a USB stick that contains installers and documentation for the T.O.V.A. 9.0 and can be used for booting the PTE.
Some systems may already be configured to boot from a flash drive, some will need to be reconfigured, some will need special actions (pressing ‘Esc’ or ‘F12’) at the boot screen, and a few systems simply will not do it.
If you do not have a T.O.V.A. flash drive, please contact T.O.V.A. customer service. If you have a T.O.V.A. flash drive, you can select it as a launch preference for booting the PTE:
Mac OS X 10.11 users will need to use the keyboard to select the T.O.V.A. flash drive. Hold the ‘Option’ key after the startup chime when rebooting to bring up a menu of boot devices. Select the flash drive in the list. It may be labelled “Windows" due to how the drive is formatted.
If you have problems using the T.O.V.A. flash drive, contact T.O.V.A. technical support. We will do our best to help you get it working or offer alternatives.
If you are using the T.O.V.A. flash drive to boot the PTE, it is critical that it remain up-to-date, with a version of the PTE that matches the T.O.V.A. software. If you have a Windows PC, contact technical support for information on updating your T.O.V.A. flash drive or creating or ordering a new T.O.V.A. flash drive.
If you are using a Mac, the T.O.V.A. 8.2 for Mac added a script for downloading and burning the latest PTE image to your T.O.V.A. flash drive all in one step.
The script will download the latest version of the PTE boot image from our website and then burn it to the T.O.V.A. flash drive. Warning: to save download time, this is a different image than the writable Installer image that is shipped on the T.O.V.A. flash drive. The previous contents, including documentation and installers, will be erased. Please save any files you have written to the flash drive before running this script. When it has finished, you can use the T.O.V.A. flash drive to boot the latest PTE.
The T.O.V.A. 8 added a new kind of T.O.V.A. test session, the External Audio/Video session, that does NOT require rebooting your system. That’s because instead of relying on your system clock, video, etc., the new T.O.V.A. hardware handles the timing itself.
What an External A/V session DOES require is a desktop system or a laptop with an external monitor (and speakers for the Auditory test). There must be an external monitor plugged into the T.O.V.A. USB device for T.O.V.A. testing without rebooting to the PTE.
The T.O.V.A. USB device is installed between your computer and your monitor and speakers. When connected correctly, this will have no effect on how you use your computer: Video and audio simply pass through the T.O.V.A. USB device . When you start the T.O.V.A. test, however, the T.O.V.A. USB device temporarily interrupts your audio and video, instead displaying the T.O.V.A. test. Once the test is completed (or interrupted), your audio and video pass through as normal.
Note: Please make sure to disable, at least temporarily, any Sleep/Standby/Hibernate power settings for your system. Because External A/V testing does not use the keyboard or mouse, some systems will shutdown due to inactivity. See section 34.8 for more information.
We manage the video (or audio) and microswitch, removed from your operating system’s unpredictable delays, so you get the same reliable timing precision and accuracy we have been providing for decades.
If you cannot provide the EAV test’s hardware requirements, you will want to use the PTE test instead (section 31).
If you have set up your hardware for EAV testing, you can check that it’s working and connected correctly. Run the T.O.V.A. and go to ‘Help’, ‘Check T.O.V.A. Hardware’, ‘Test your hardware setup’. This wizard will walk you through verifying all of your connections.
Note: If the first page of the Hardware Setup wizard talks about the “PTE" instead of the “EAV", you need to change your launch settings. Run the T.O.V.A. and go to ‘Preferences’, ‘Session launch’, select ‘External Audio/Video (EAV)’, and click ‘Save’, then try the Hardware Setup wizard again.
The T.O.V.A. 8 introduced new multimedia test instructions, with text to read and audible instructions to listen to. There are even pictures to illustrate how the test will appear and how to hold the microswitch.
The T.O.V.A. 8.2 added several new languages, so that you can give your test subject instructions in their own language: Danish, English, French, German, Hebrew, Korean, Spanish, and Swedish are currently available. We hope to add more languages in the future—contact T.O.V.A. customer service to let us know which you’d like to see instructions in (section 27).
As with previous versions, the T.O.V.A. tester may also choose to give test instructions manually. The sections to follow will tell you how to adjust and control the multimedia test instructions to suit your needs and the needs of your subjects.
For information on changing the language of your T.O.V.A. Test Instructions, see section 18.4.1.
By default, the T.O.V.A. test instructions are automatic, but to better control the pace of instructions, you may want to turn off the sound and read the instructions aloud. While the instructions are playing, you can press ‘S’ to turn off and on the sound, the space bar to pause the instructions, and the left and right arrow keys to go forward or backward. Press ‘Esc’ to skip the instructions completely.
Note: If the instruction audio is turned off or unavailable (missing or unrecognized sound card, for instance), the instructions will not proceed automatically. You must skip through the instructions manually with the right arrow key or space bar.
The following are instructions you may read aloud to the subject. The wording assumes that you are stepping through the multimedia instruction pages. You may want to adapt them to your needs and those of your subject, particularly if you’re only using the book. The images to follow can help you. If you would like these instructions in a different language, please contact T.O.V.A. customer service (section 27).
Read the following:
Welcome to the T.O.V.A. test.Hold the button in your writing hand with your thumb resting lightly on top of the button, like this.(indicate Figure 109) When you press the button, let up as soon as you hear the click (click the button); you don’t have to hold it down.
This test measures your ability to pay attention. Two different squares will flash on the screen. One square has a small black square near the top, like this (indicate Figure 110), and the other has the small square near the bottom, like this (indicate Figure 110). The squares will flash on the screen, like this: (Multimedia instructions show a brief animation of the test.)
Press the button as fast as you can every time you see a square with the small square near the top and don’t press the button when the small square is near the bottom. Once again, press the button only when you see the small square near the top.
Don’t guess which square will flash; make sure you see it before you press the button. Try to balance speed and accuracy: press the button as fast as you can, but also try not to make any mistakes. If you do make a mistake, don’t worry: anyone can make a mistake on this test.
Let’s review:
- Press the button as fast as you can, but only when you see the small square near the top.
- When you press the button, only press it once and don’t hold it down. Just “click" the button.
- Finally, don’t go too fast or try to guess; take enough time to see which square it is.
You are about to take a short practice test. After a countdown, the squares will begin to flash. Remember, be as fast and accurate as you can.
For subjects over 5.5 years old, read the following:
You are about to take the T.O.V.A. test, which will take about 20 minutes.You might notice that your eyes get a little tired. Even so, try and do the best job you can. Remember to press the button as quickly as you can, but only when the small square is near the top.
For subjects 4 to 5.5 years old, read the following instead:
You are about to take the T.O.V.A. test, which will take about 10 minutes.You might notice that your eyes get a little tired. Even so, try and do the best job you can. Remember to press the button as quickly as you can, but only when the small square is near the top.
Note: Even when the sound is turned off, the multimedia test instructions will demonstrate the auditory stimuli audibly.
Read the following:
Welcome to the T.O.V.A. test.Hold the button in your writing hand with your thumb resting lightly on top of the button, like this.(indicate) When you press the button, let up as soon as you hear the click (click the button); you don’t have to hold it down.
This test measures your ability to pay attention. Two different tones will play on the speakers. One tone is a high note, and the other is a low note. The tones will play every few seconds.
Press the button as fast as you can every time you see hear the high note and don’t press the button when you hear the low note. Once again, press the button only when you hear the high note.
Don’t guess which tone will play; make sure you hear it before you press the button. Try to balance speed and accuracy: press the button as fast as you can, but also try not to make any mistakes. If you do make a mistake, don’t worry: anyone can make a mistake on this test.
Let’s review:
- Press the button as fast as you can, but only when you hear the high tone.
- When you press the button, only press it once and don’t hold it down. Just “click" the button.
- Finally, don’t go too fast or try to guess; take enough time to decide which tone it is.
You are about to take a short practice test. After a countdown, the tones will begin to play. Remember, be as fast and accurate as you can.
For subjects over 5.5 years old, read the following:
You are about to take the T.O.V.A. test, which will take about 20 minutes.You might notice that you get a little tired. Even so, try and do the best job you can. Remember to press the button as quickly as you can, but only when hear the high tone.
For subjects 4 to 5.5 years old, read the following instead:
You are about to take the T.O.V.A. test, which will take about 10 minutes.You might notice that you get a little tired. Even so, try and do the best job you can. Remember to press the button as quickly as you can, but only when hear the high tone.
This reference section gives simple instructions on technical procedures.
If you encounter problems using the T.O.V.A. PTE, we may ask you to send us a Hardware Information log from the PTE. This will send us information about how the PTE sees your system hardware and may enable us to improve the next version of the PTE.
Note: Generating a PTE log will overwrite any test data on the T.O.V.A. USB device .
If you’re not in the PTE at the moment (i.e., you’re in Windows or MacOS, and you can run other applications, browse the web, etc.), sending us hardware information is easy!
If you are, just boot to the PTE as usual. Choose ‘OK’, and your computer will begin restarting. It will collect the information and return to your OS.
If you are not able to boot the PTE, use the T.O.V.A. flash drive to send us a log:
Note: If your computer does not boot from the flash drive, then you may need to reconfigure your computer; see section 31.5.3 for more information.
The information you send may help us resolve the issue for you and likely others as well. Thank you for helping us improve the T.O.V.A. !
If you’re already in the PTE and encountering problems, sending us hardware information is still pretty easy:
Note: Generating a PTE log will overwrite any preference changes and test data on the T.O.V.A. USB device .
If we believe there is a specific problem involving communication with the T.O.V.A. USB device , we may direct you to send us a Device communication log. The purpose of this log is to record the nitty-gritty details of interactions between the T.O.V.A. USB device and the PTE.
Note: Generating a PTE log will overwrite any preference changes and test data on the T.O.V.A. USB device .
The information you send may help us resolve the issue for you and likely others as well. Thank you for helping us improve the T.O.V.A. !
With the T.O.V.A. 9’s Automatic Update, we’ve tried to make keeping your T.O.V.A. up-to-date with the latest features and fixes easier than ever. However, sometimes automatic update will fail (Did you really close all your programs before updating?), and in this case you may want to update your T.O.V.A. manually.
A manual update works just as well as the automatic one, with one caveat: You must have access to Administrator permissions. Here’s how you do it:
This will give you the installer (a ‘.pkg’ or ‘.exe’ file), and you should download it to somewhere you can find it.
Note: The installer is large (about 125 MB at the moment). If you have problems downloading it, you might need to find a system with a better internet connection. We’ve seen problems with some Wi-Fi connections, though most work fine. You can always download the installer from a more reliable connection to a USB flash drive and take it to the other machine. If you do not have a flash drive available for this purpose, you can request one from The TOVA Company.
That’s it! The good thing about a manual update is that it may make apparent what error was causing the update to fail before, and perhaps even let you correct it.
Note: We recommend ALWAYS backing up your T.O.V.A. database (section 21) before attempting any procedure such as this.
Moving your database is pretty easy in the T.O.V.A. 9.0. First, make sure you’ve backed up your T.O.V.A. database (section 21). Then simply change your database path, and the T.O.V.A. will offer to move the database for you. Here’s how it works:
Note: To move your database to a different computer, you can simply back up your database (section 21), copy the backup file to the new computer, and import it (section 22).
You can still always move your database as you previously could in the T.O.V.A. . This includes these main steps:
If you’re not comfortable with these steps, contact T.O.V.A. technical support for assistance. We are happy to help.
You can choose a different location to store your database (see section 25.4 above). Click ‘Change path’ to select a new database location, or you can type the path into the selected ‘Path’ field. There are a few things to remember when changing your database path:
Note: If your computer is shared by multiple users, make sure the new path to the database has the correct file/folder permissions.
There are a few different reasons why a database may fail to open:
WARNING! Storing data on a server or network share will most likely result in lost data! Many of the problems below can be caused by attempting to share a T.O.V.A. database over a network. This is NOT supported and will inevitably cause problems.
The T.O.V.A. 9.0 has built-in automatic backups (section 25.5), though we recommend you also perform your own system backups to a secure location. If you have full access to the database path and the T.O.V.A. database still fails to open, please contact T.O.V.A. technical support (section 27). We can often help users recover some or all of their data.
If your T.O.V.A. database cannot be opened, the T.O.V.A. may offer to move the non-working database aside. If successful, the T.O.V.A. can then create a new, empty database where the former database was. That way, you can test new subjects, then contact The TOVA Company at a convenient time to recover your previous data, if possible. The original database that could not be opened will be preserved, renamed, in the same database folder.
Note: It’s important that you make sure you’re administering the T.O.V.A. test for the correct subject, as children below the age of five-and-a-half do not take the same test as older subjects. If you administer the wrong test to your subject, the T.O.V.A. will not be able to properly interpret it.
Note: Do not try to reassign the test by editing the subject! If the test is assigned to Joe and it should have been assigned to Mary, editing the subject information will only leave you with two identical ‘Marys’.
You can reassign tests that have been administered or assigned to the wrong subject, but you should do so cautiously. Do the following:
There are certain T.O.V.A. preferences that require administrative privileges to access. If you are unable to access Admin preferences in the T.O.V.A. 9.0, you should run T.O.V.A. Admin Settings with administrative privileges.
Note: We do not recommend configuring the main T.O.V.A. 9.0 application to always run with elevated permissions.
Note: Some preferences that can be modified in the T.O.V.A. application are not accessible in T.O.V.A. Admin settings.
Windows has a security feature called User Account Control. Even if you are an Admin user, you will usually run applications without Admin privileges. However, as long as you have access to an Administrator account, you can still modify T.O.V.A. Admin preferences.
The easiest way is from the T.O.V.A. ’s Preferences window, which got a new button in v8.2, ‘Change Admin settings’.
You can also still use the separate T.O.V.A. Admin Settings application:
Most users who have one account on their computer have that account configured as an Administrator already and can edit admin preferences. There is a script in the TOVA folder to give more limited users temporary access to admin preferences.
When a computer is not being used for a while, some systems are configured to go into “Sleep mode", “Standby mode", “Hibernation", or some other power saving state. While this is good for conserving energy, it can be bad for External A/V testing. Because the T.O.V.A. test does not use the computer or mouse, some systems can fall asleep during a test, which will essentially ruin the results of the test.
To counter this, we’ve implemented a “mouse jiggle". While the T.O.V.A. test is being administered, the mouse cursor will move just slightly to the left and then the right. None of this is visible to the subject, because the T.O.V.A. USB device is sending a different video signal to the screen.
The mouse jiggle does not work on all PCs, however. To be on the safe side, we recommend that you disable Sleep Mode on any T.O.V.A. system where you intend to do External A/V testing. If that’s not possible, the computer should wait at least an hour.
Note: How to disable Sleep Mode on a given system can vary somewhat. If the instructions below don’t work for you, contact your system’s manufacturer.
This reference section contains articles on specific features of the T.O.V.A. , discussed in more detail.
Everything starts from the main T.O.V.A. window. Some of these options may not always be available.
There’s a search field at the top of the T.O.V.A. main window. When you type a search term and press ‘Enter’, the tables update to display subjects and sessions that match your search.
How it works is best explained with an example: If you enter joe smith, the search will return the subjects and sessions that contain joe and smith. This might mean a subject named Smith whose T.O.V.A. test was administered by a tester named Joe. It will also find subjects and sessions containing a name such as Joel Nesmith, and John Smithy whose Treatments include 3 cups of Joe. It won’t, however, find records that have joe but not smith or vice verse; by default, search looks for records containing all search terms.
You can also use the OR operator. Enter joe OR smith to find all the subjects and sessions that contain either joe or smith. Note: OR must be capitalized, or it will be treated like another search term (joe or smith will look for subjects and sessions containing joe, or, and smith).
Confused yet? Play around with it–we bet you’ll figure it out!
Text searches include the following fields:
If you give an integer(1234), then the term is also matched against subject number and session number.
You can also use dates: If a term is parsable as a date (5/12/2009), the results will include subjects with that birthdate and sessions with that test date. You can also use before: and after:, to provide a range of test dates; for instance, after:9/1/2004 before:9/8/2004 will return all the tests administered September 1st through 7th, 2004. (Note: Test dates are interpreted as 12 midnight, so after:9/1/2004 includes all tests administered that day, but before:9/1/2004 would not include any.)
Finally, as with other search engines, you can search on multiple terms. If you enter john smith, for instance, you will see all of the subjects/sessions that include the word “joe" and the word “smith" anywhere in the subject or session information (including the comments, tester, custom fields, etc.) You can also enter
You can restrict a search value to a specific field using the following strings. Note: With spaces, you must use quotes around field-specific search terms, like this: "Subject Number:123".
| Field to search # | Type # | Labels that can be used |
| Subject number | numeric | subject number, sub, subject |
| Session number | numeric | session number, ses, session |
| First name | string | first name, first |
| Last name | string | last name, last |
| First and last | string | name |
| Comments | string | comments, com, comm |
| Tester Name | string | tester name, tester, user |
| Medications | string | medications, med, meds, treatment, treatments |
| Serial number | string | serial, serial#, serial #serial number |
Sorting your T.O.V.A. data works just like most software. In the main window, click on any column header to sort the rows of the table by that field, in ascending order. So when you click on ‘Last’, it reorders the rows by the subjects’ last name, from ’A’ to ’Z’. Click the same column a second time, and it will sort in descending order, from ’Z’ to ’A’. Simple!
For instance, if you run the T.O.V.A. intending to retest Mary Smith, type Mary and press ‘Enter’, and you’ll only see those subjects or sessions. If that’s taking too long, add Smith and press ‘Enter’ again. Or enter gibberish (such as ujxzda) and press ‘Enter’, and it will clear the search results and stop loading altogether.
After you administer a session, you may want to add more information, such as medications administered (see Treatments, section 35.4) or comments about the session that you did not note beforehand. You can also update any custom session fields you have added to your T.O.V.A. database. From the main window, select the session and click ‘Edit’.
Note: While you can also modify the test date/time here, you should do so with caution. It will affect the calculated age of the subject and dictate the norms used to interpret the results of the test. If your system clock is incorrect, please correct it. If it does not hold the correct time, this can be a serious system problem; you may want to consider using a different system to administer the T.O.V.A. in the future.
If you are using USB speakers recommended by tech support to administer auditory tests, you should already have a calibration value under ‘Preferences’, ‘Stimuli settings’. If you administered a session before you added this calibration setting, here is where you can modify the setting so that the timing for this session is properly calibrated. If that didn’t make any sense to you, DON’T TOUCH THIS SETTING. Instead, if you’re worried, please contact T.O.V.A. technical support (section 27).
You can track medications and other treatments in the T.O.V.A. 9.0. When starting a new session or editing an administered session, click ‘Add’ to add a treatment to the list. There is no limit to the number of treatments you can add to a session.
You can add three different types of treatments:
Here you can read the other manuals, test the T.O.V.A. USB device and PTE, and contact us.
This displays information about your T.O.V.A. software and hardware, useful to T.O.V.A. technical support.
If you need to contact The TOVA Company for support or service, this tells you all you need to know, such as our phone number and web address. For the best service, click one of these buttons to use our built-in Support/Service Request feature. See section 27.
You can access any of the manuals or other T.O.V.A. documentation from the Help window. If you want to learn more about the T.O.V.A. , we’ve put all the information here:
For the most part, you will not need to use the Advanced Support features here. However, if you contact T.O.V.A. technical support, they may ask you to try one of these operations to help diagnose a problem.
There are a few features that were part of the T.O.V.A. 8 that were removed from the T.O.V.A. 9.0 when it was cleared by the FDA as a medical device. These features have not been cleared for use in a clinical setting, but if you would like to use the T.O.V.A. in a non-clinical research setting, you can switch to “Research mode” in the T.O.V.A. Preferences (section 25.9). Test sessions administered in Research mode will be flagged as research sessions, and the T.O.V.A. report will reflect this.
Likewise, the T.O.V.A. Synchronization Interface (see the T.O.V.A. Sync Interface manual for more information) is intended for research use only and sessions administered using the device will produce research sessions. A warning will appear whenever you start a new session with the sync interface attached unless you enable Research mode in the Preferences.
When the T.O.V.A. is in Research mode, “Research Mode” will appear under the T.O.V.A. logo in the main window.
When the T.O.V.A. is in research mode, these additional features become available:
All manuals are available from your Windows Start menu, even with Research mode disabled.
For more information about these features, see the T.O.V.A. Research User’s manual. Let us know (section 27) if there are features you would like available for clinical or research use in future versions of the T.O.V.A. .
This reference section contains the articles that don’t fit elsewhere.
The T.O.V.A. 9.0 is compatible with most Windows 8 and Windows 10 desktops using EAV testing (section 32). However, new Windows 8 and 10 systems are required (by Microsoft) to have UEFI with SecureBoot enabled. Because of that, these laptops cannot boot the PTE automatically. Some can be configured to boot the PTE from the T.O.V.A. CD or flash drive, but that can be difficult for users who are not tech savvy and impossible on many systems.
For this reason, you should not try to use the PTE on a new Windows 8 or Windows 10 system at this time. Overcoming this problem is a priority for us, and we hope to have a solution soon.
Note: If you have an older system (Windows 7 or earlier) that you updated to Windows 8 or 10, it will most likely not use UEFI, and it should boot the PTE just fine.
Note: The Skylake line of Intel processors does not support the BIOS video extensions that we use for precise timing. As a result, the vertical sync fails, and the current PTE will not boot on systems that have it, including Windows 7 systems.
This includes, but is perhaps not limited to, the following models:
Note: This is here for Windows users and does not apply to Mac systems.
The T.O.V.A. 9.0 is a Java program, and that means it requires the Java Runtime Environment (JRE) to run. Specifically, the T.O.V.A. 9.0 uses Java 8 (sometimes called JRE 1.8).
In previous T.O.V.A. releases, we installed the Java 6 in a conventional way. This became a problem because, when new Java versions became available, Java 6 might be uninstalled, and the T.O.V.A. (which expected Java 6) would stop working. Additionally, some users have had security concerns about the installed Java.
With the T.O.V.A. 9.0, we are instead installing a local copy of the v8 JRE for the T.O.V.A. to use. This will not be updated or uninstalled by the Java installer and does not require Java to be conventionally “installed" at all. It does not need to installed or enabled in your browser either. We think this will be a simpler approach for our customers.
If you still have Java 6 installed from an earlier version of the T.O.V.A. , you may uninstall it. However, be aware that other software on your PC may still use Java 6 and require that it be installed. That is why we do not uninstall it automatically when you update to the T.O.V.A. 9.
If your IT department requires that all software uses the latest Java version, they can copy their preferred version of the Java files into the following path:
C:\Program Files (x86)\tova_9\Java) or C:\Program Files\tova_9\Java,
Is all this now clear as mud? Please contact T.O.V.A. technical support (section 27), and we’ll be happy to answer your questions or assist you with any changes. We want to keep our T.O.V.A. users up and running!
Yeah, we’d prefer there weren’t any errors in our software too. But occasionally—sometimes even through no fault of our own—the unexpected occurs.
Sometimes the error may make perfect sense to you. We try to generate meaningful error messages, but it’s not always possible.
If a message confuses or disturbs you, please contact T.O.V.A. technical support. The best way to alert us is using the T.O.V.A. ’s built-in tech support interface: Just click ‘Send to tech support’ from most error windows or see section 27 for more information. If your need is urgent, you can call us at 1-800-PAY-ATTN (1-800-729-2886), or you can email us at info@tovatest.com. Best of all, our Tech Support is always FREE!
Having trouble finding your T.O.V.A. data? There are a few possible explanations for this:
Note: Even if there was nothing in the search field to begin with, there can be occasional display glitches. Pressing ‘Enter’ will refresh the contents of the main window and fix most of these problems. If you find any repeatable problems (“Every time I do this, the display does that.”), please let us know. We want to fix any such problems.
If you try to run the T.O.V.A. and you get this message, it indicates that the T.O.V.A. is already running. If you were to run your Windows Task Manager, though, you would not find tova.exe and killing tova-pte-svc.exe would not help you.
The T.O.V.A. is a Java application (which is why it runs on both Windows and Mac systems) and runs on your system as javaw.exe. If you arrive at this window, clicking ‘Restart’ will tell the other T.O.V.A. instance to exit. On the other hand, if you perhaps forgot the T.O.V.A. application was already running, you can just click ‘OK’, and the new instance will exit.
If the T.O.V.A. encounters a serious problem and the previous instance will not terminate, click ‘OK’ and end any other javaw.exe tasks that are running, reboot your system, or just contact T.O.V.A. technical support (section 27). We’re happy to help.
Note: This section applies only to Windows users.
The T.O.V.A. 9 PTE Activation service is a background service we install on Windows to perform important tasks related to booting the PTE and installing T.O.V.A. updates. Windows users with limited permissions would not normally have access to all the functions this service performs. Therefore, instead of requiring that all T.O.V.A. users have Admin rights in Windows, the T.O.V.A. 9 service acts as a system administrator to carefully perform these operations on request. These include the following:
Click the ‘Status’ button on the main window and then ‘Service’, and you’ll see the current status of the T.O.V.A. 9 PTE Activation service. If the service has unexpectedly stopped or failed to start, click ‘Start service’ to attempt to restart the service. (Note: This requires administrator access to your PC.)
‘View Windows services’ will launch the Windows Services console. Here you can see all of your installed Windows services, including the T.O.V.A. 9 PTE Activation service.
If you are unable to resolve any problems, you can disable the T.O.V.A. service (see section 36.6.2 for details). Otherwise, click ‘Send to tech support’ for more help with the problem.
Some Windows systems encounter problems with the T.O.V.A. service (conflicting security settings, for instance). In version 8.2, we’ve created a workaround: disabling the service.
The T.O.V.A. service performs necessary operations that many Windows users don’t have access to. When you disable the service, the T.O.V.A. performs the same operations without employing the service. Since these are advanced operations, you may be prompted to “allow the following program to make changes to this computer" before and after launching a T.O.V.A. session. Granting this permission requires you to have administrator access to your system.
You can disable the service as follows:
If the Admin prompts become too tiresome, you may also want to select ‘Windows boot menu’ in your Session launch preferences (section 25.12.2).
Please note: Disabling the T.O.V.A. service in T.O.V.A. preferences will not stop the service from running in the background or uninstall it from your PC, but that should not be necessary. If you have problems with the T.O.V.A. 9 PTE Activation service itself, even after it has been disabled, please contact T.O.V.A. technical support (section 27).
The T.O.V.A. 9 PTE Activation service is a background service we install on Windows to perform important tasks related to booting the PTE and installing T.O.V.A. updates.
If you see the dialog above (Figure 121), there can be several reasons:
You can start the service manually:
If you receive an error, the service won’t start, or it stops after it starts, please send a Tech Support Request to T.O.V.A. technical support (see section 27 for details). You may have software that is blocking the service, or it may not have installed properly.
Windows startup is a little funny, and sometimes the T.O.V.A. 9.0 application starts up before the service. The T.O.V.A. will wait and try five times to communicate with the service, but depending on your system’s configuration, speed, age, etc., it’s possible that it might take longer. If you find that the T.O.V.A. 9 service is already running, try restarting the T.O.V.A. to see if it still fails to communicate.
The T.O.V.A. 9 service communicates locally on port 26001 by default. Windows Firewall, even if it blocks that port, will not block our communication because it’s local to your machine; in other words, we don’t use that port to communicate over your network or the internet. So this possibility is not likely, but we can handle this too.
If you must block that port on your system, you can change the port number we use in the T.O.V.A. Preferences (section 25.9) and in \tova_8\service\tova-pte-svc.ini . Note: You must change both settings for communication to work.
Some users might not want the T.O.V.A. to reboot their system, and so we offer the option ‘Reboot later’ in the PTE launch settings. The T.O.V.A. prepares your system to boot the PTE and then exits. If, instead of rebooting your system, you run the T.O.V.A. application, you will see this window (Figure 122), giving you the option to have the T.O.V.A. reboot your system or cancel booting the PTE. The latter will clear away the prepared files, restore your normal boot settings, and start the T.O.V.A. application.
The T.O.V.A. will automatically startup after returning from the PTE. If you want the T.O.V.A. never to startup automatically in Windows, remove the shortcut from your Startup folder. For more information on the PTE, see section 31.
If you encounter a message like this saving a session to your database, it can be confusing. It usually indicates that you are trying to save a session to a different database than launched it. This can happen if you are running the T.O.V.A. on multiple PCs or from different logins on the same PC. If you can, exit the T.O.V.A. application and try to save the test data on the original PC and login.
If you cannot, click ‘OK’, and you will be prompted to either match the session to the same subject in this database or to create a new subject with the name, birthdate, and gender from the test data on the device. Any additional information you entered in the New Test Session window (Treatments, Tester, Comments, etc.) will need to be re-entered, but the critical information and test data will be saved.
If the T.O.V.A. finds that a new or edited subject looks similar, but not identical, to another subject in the database, it will ask you to resolve the situation. Often this can happen if a subject has been entered as “John" and “Jack" or the name was just misspelled.
You are asked to decide if the two subjects are actually different people or not. If they are the same subject, choose either the new subject information or the existing information from the similar subject.
This is where we try to anticipate and answer questions you might have about the T.O.V.A. .
If you’re testing without rebooting, what we call External A/V (EAV) testing, you must connect your monitor to the ‘video out’ port of the T.O.V.A. USB device . If you haven’t done this correctly, you may first notice this when you try to calibrate your display and the calibration image doesn’t appear. Please check your connections and make sure the monitor is plugged into the correct video port. See section 13.2 for more details.
Your T.O.V.A. USB device is not enabled for ordering unless or until we have billing information for your account. If you encounter this error, you should contact T.O.V.A. customer service, and they will be happy to help you resolve the problem.
In this manual, we use numerous acronyms, abbreviations, and technical terms, so we’ve tried to define all of our proprietary terms and acronyms here.
Note: If you don’t find it here, you can easily search the electronic .PDF version of this manual.
In other words, you can use most laptops or notebooks to administer an External A/V test if you also have a separate display you can attach to the T.O.V.A. USB device .
In other words, you can administer an EAV Auditory test on a laptop or notebook if you have a separate display and speakers you can attach to the T.O.V.A. USB device .
Note: Some monitors have built-in speakers. You can use these displays to administer an External A/V test provided they have separate video and audio plugs you can attach to the T.O.V.A. USB device .
Appendix |
This is the appendix.
The T.O.V.A. USB device and microswitch (“the T.O.V.A. hardware”) must be installed and put into service according to the electromagnetic compliance (EMC) guidelines and declarations provided here.
Table A-1 Electromagnetic emissions Table A-2 Electromagnetic immunity Table A-3 Electromagnetic immunity for non-life-supporting equipment Table A-4 Recommended Separation Distances Between Radio-frequency (RF) Communications Equipment for Non-life-supporting Equipment
Note: Portable and mobile RF communications equipment can affect the operation of the T.O.V.A. hardware.
Warning: The use of accessories and cables other than those sold by The TOVA Company may result in increased emissions or decreased immunity of the T.O.V.A. hardware.
Table A-1. Guidance and manufacturer’s declaration— electromagnetic emissions
The T.O.V.A. hardware is intended for use in the electromagnetic environment specified below. The customer or user of the T.O.V.A. hardware should ensure that they are used in such an environment. Emissions Test Compliance Electromagnetic Environment— Guidance RF emissions
CISPR 11Group 1 The T.O.V.A. hardware uses RF energy only for its internal functions. Therefore, its RF emissions are very low and are not likely to cause any interference in nearby electronic equipment. RF emissions
CISPR 11Class B 33.5inThe T.O.V.A. hardware is suitable for use in all establishments, including domestic establishments and those directly connected to the public low voltage power supply network that supplies buildings used for domestic purposes. Harmonic emissions
IEC 61000-3-2Not Applicable Voltage fluctuations / flicker emissions
IEC 61000-3-3Not Applicable
Table A-2. Guidance and manufacturer’s declaration— electromagnetic immunity
The T.O.V.A. hardware is intended for use in the electromagnetic environment specified below. The customer or user of the T.O.V.A. hardware should ensure that they are used in such an environment. Immunity Test IEC 60601 Test Level Compliance Level Electromagnetic Environment—Guidance Electrostatic discharge (ESD)
IEC 61000-4-2±6 kV contact
±8 kV air± 6 kV contact
± 8 kV airFloors should be wood, concrete, or ceramic tile. If floors are covered with synthetic material, the relative humidity should be at least 30%. Electrical fast transient/burst
IEC 61000-4-4± 2 kV for power-supply lines
± 1 kV for input/output lines± 2 kV for power-supply lines
± 1 kV for input/output linesMains power quality should be that of a typical commercial or hospital environment. Surge
IEC 61000-4-5± 1 kV differential mode
± 2 kV common modeNot applicable Mains power quality should be that of a typical commercial or hospital environment. Voltage dips, short interruptions, and voltage variations on power-supply input lines
IEC 61000-4-11< 5% UT (> 95% dip in UT) for 0.5 cycle
40% UT (60% dip in UT) for 5 cycles
70% UT (30% dip in UT) for 25 cycles
< 5% UT (> 95% dip in UT) for 5 sec.Not applicable Mains power quality should be that of a typical commercial or hospital environment. If the user of the T.O.V.A. hardware requires continued operation during power mains interruptions, it is recommended that the T.O.V.A. hardware be powered from an uninterruptible power supply or a battery. Power frequency (50/60 Hz) magnetic field
IEC 61000-4-83 A/m 3 A/m Power frequency magnetic fields should be at levels characteristic of a typical location in a typical commercial or hospital environment.
Note: UT is the AC mains voltage before application of the test level.
Table A-3. Guidance and manufacturer’s declaration— electromagnetic immunity for non-life-supporting equipment
The T.O.V.A. hardware is intended for use in the electromagnetic environment specified below. The customer or user of the T.O.V.A. hardware should ensure that they are used in such an environment. Immunity Test IEC 60601 Test Level Compliance Level Electromagnetic Environment—Guidance Conducted RF
IEC 61000-4-63 Vrms,
150 kHz to 80 MHz3 Vrms 23inPortable and mobile RF communications equipment should be used no closer to any part of the T.O.V.A. hardware, including cables, than the recommended separation distance calculated from the equation applicable to the frequency of the transmitter.
Recommended separation:
d = 1.2 √P
d = 1.2 √P 80 MHz to 800 MHz
d = 2.3 √P 800 MHz to 2.5 GHz
where P is the maximum output power rating of the transmitter in watts (W) according to the transmitter manufacturer, and d is the recommended separation distance in meters (m). Field strengths from fixed RF transmitters, as determined by the electromagnetic site survey,a should be less than the compliance level in each frequency range.b Interference may occur in the vicinity of equipment marked with the following symbol:

Radiated RF
IEC 61000-4-33 V/m,
80 MHz to 2.5 GHz3 V/m
Note 1: At 80 MHz and 800 MHz, the higher frequency range applies.
Note 2: These guidelines may not apply in all situations. Electromagnetic propagation is affected by absorption and reflection from structures, objects, and people.
a Field strengths from fixed transmitters, such as base stations for radio (cellular/cordless) telephones and land mobile radios, amateur radio, AM and FM radio broadcast, and TV broadcast cannot be predicted theoretically with accuracy. To assess the electromagnetic environment due to fixed RF transmitters, and electromagnetic site survey should be considered. If the measured field strength in the location in which the T.O.V.A. hardware is used exceeds the applicable RF compliance level above, the T.O.V.A. hardware should be observed to verify normal operation. If abnormal performance is observed, additional measures may be necessary, such as reorienting or relocation of the T.O.V.A. hardware.
b Over the frequency range 150 KHz to 80 MHz, field strengths should be less than 3 V/m.
Table A-4. Recommended separation distances between portable and mobile RF communications equipment and the T.O.V.A. hardware.
The T.O.V.A. hardware is intended for use in an electromagnetic environment in which radiated RF disturbances are controlled. The customer or user of the T.O.V.A. hardware can help prevent electromagnetic interference by maintaining a minimum distance between portable and mobile RF communications equipment (transmitters) and the T.O.V.A. hardware as recommended below, according to the maximum output power of the communications equipment. 21.5inRated Maximum Output Power of Transmitter (in watts) Separation Distance According to
Frequency of Transmitter (in meters)150 kHz to 80 MHz
d = 1.2 √P80 MHz to 800 MHz
d = 1.2 √P800 MHz to 2.5 GHz
d = 2.3 √P0.01 0.12 0.12 0.23 0.1 0.38 0.38 0.73 1 1.2 1.2 2.3 10 3.8 3.8 7.3 100 12 12 23
For transmitters rated at a maximum output power not listed above, the recommended separation distance d in meters (m) can be estimated using the equation applicable to the frequency of the transmitter, where P is the maximum output power rating of the transmitter in watts (W) according to the transmitter manufacturer.
Note 1: At 80 MHz and 800 MHz, the separation distance for the higher frequency range applies.
Note 2: These guidelines may not apply in all situations. Electromagnetic propagation is affected by absorption and reflection from structures, objects, and people.
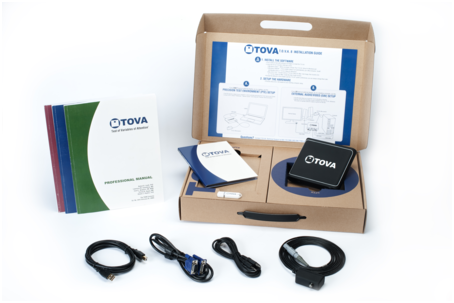 The T.O.V.A. 9.0 kit
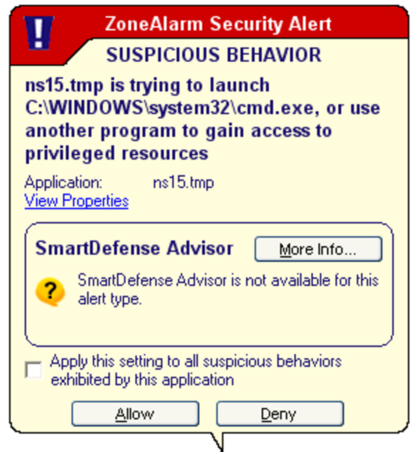 If you get a warning during install, please choose
 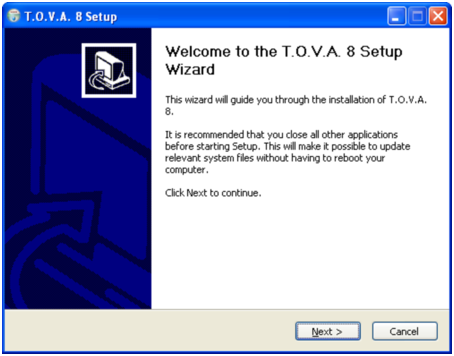 The T.O.V.A. 9.0 installer welcome screen
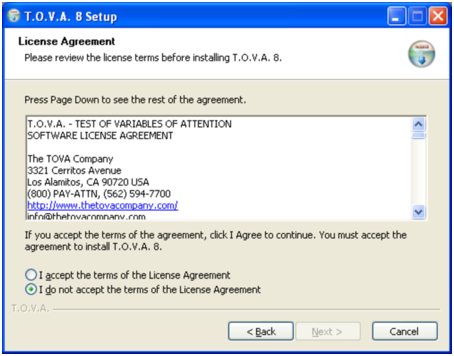 The T.O.V.A. software license
 Choosing a destination path
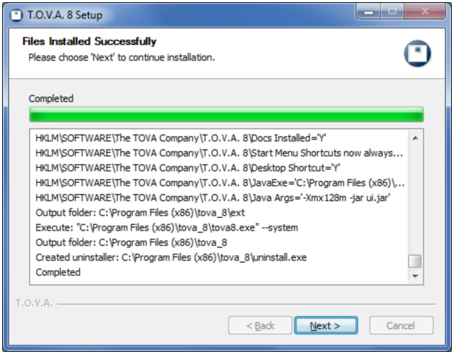 Installing files
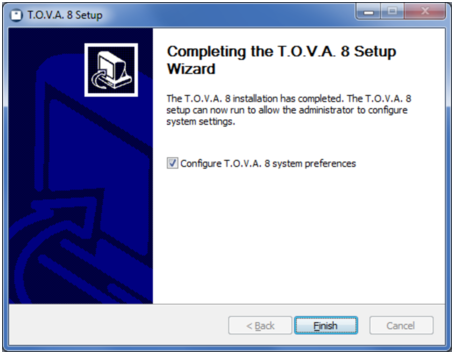 T.O.V.A. 9.0 installer is finished!
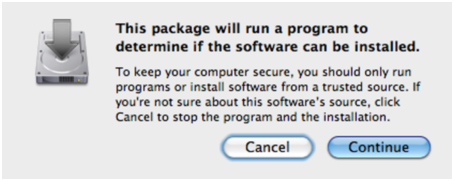 The T.O.V.A. 9.0 system check dialog
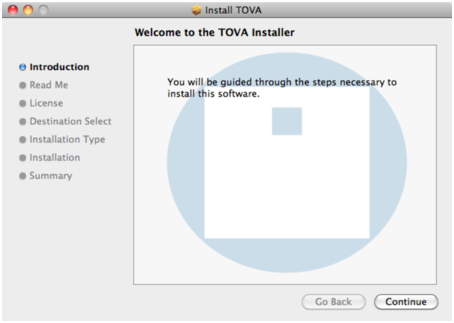 The T.O.V.A. 9.0 installer Introduction screen
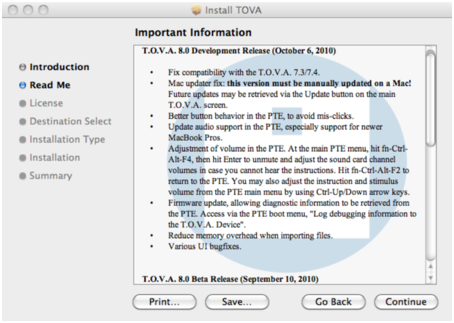 The T.O.V.A. 9.0 installer Read Me screen
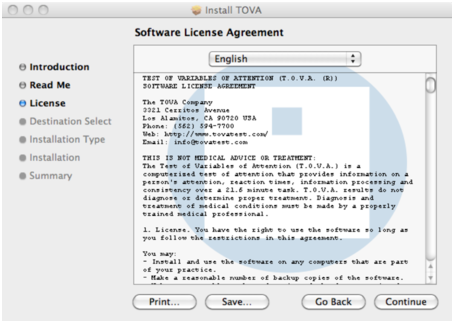 The T.O.V.A. 9.0 installer License screen
 The T.O.V.A. 9.0 installer Install Type screen
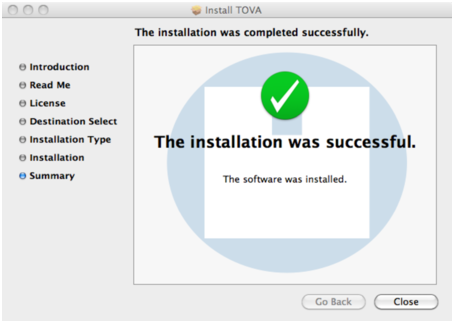 Installation complete
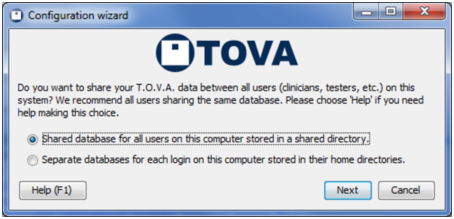 Configuration wizard
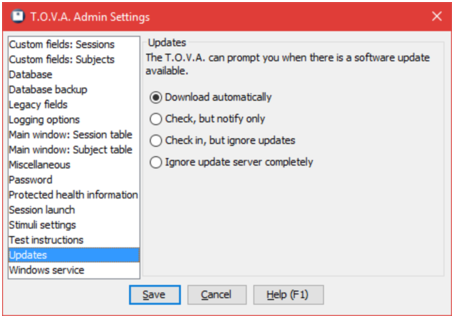 More settings
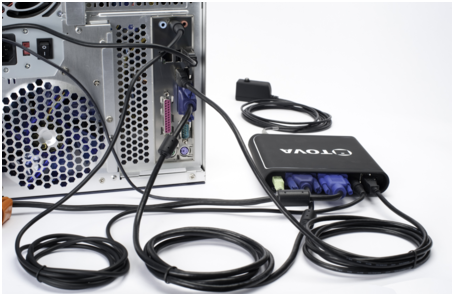 The T.O.V.A. Hardware
 USB
USB
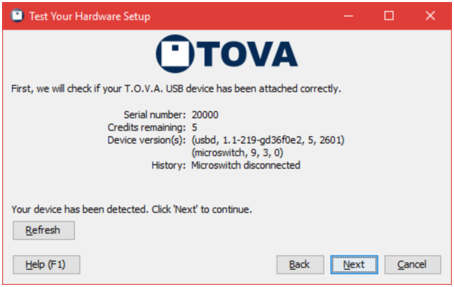 Your T.O.V.A. USB device is correctly attached
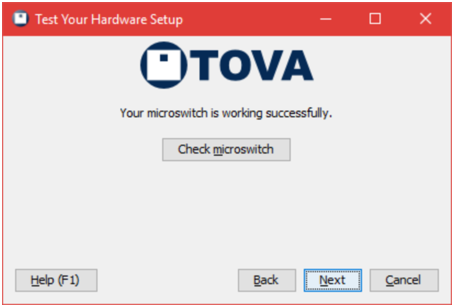 Microswitch test was successful
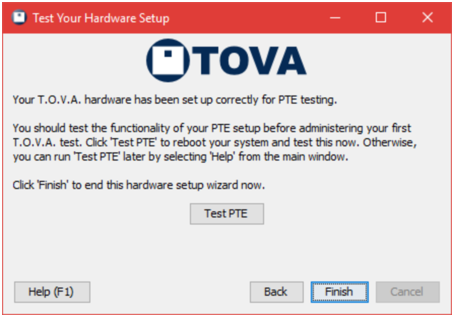 Now that your hardware is tested, test the PTE
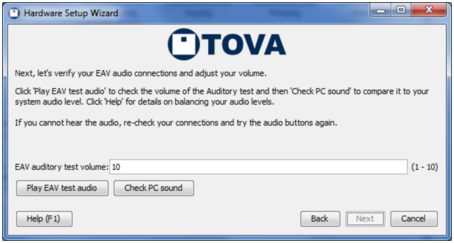 Now that your hardware is tested, test the PTE
 Now that your hardware is tested, test the PTE
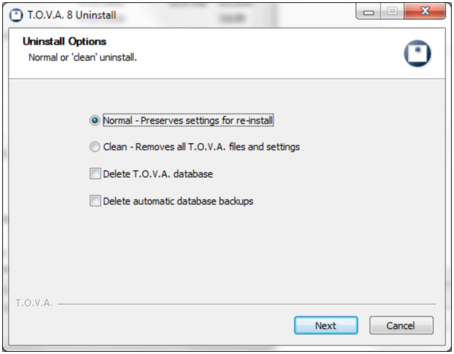 Choose your uninstall options
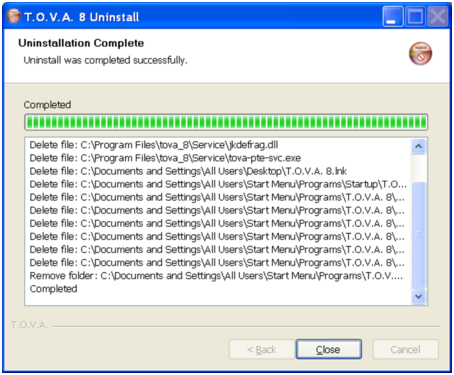 Details of the uninstall
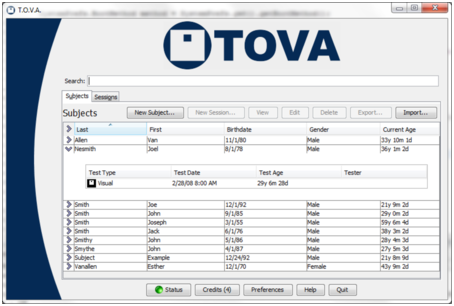 Main T.O.V.A. window
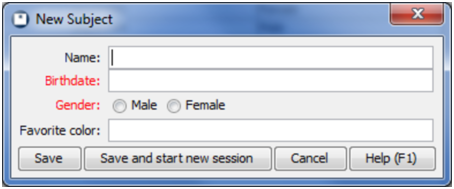 New Subject window
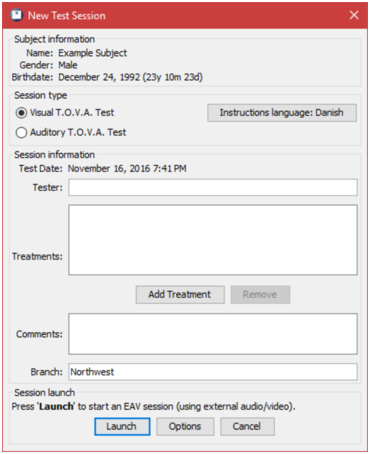 Choose session options
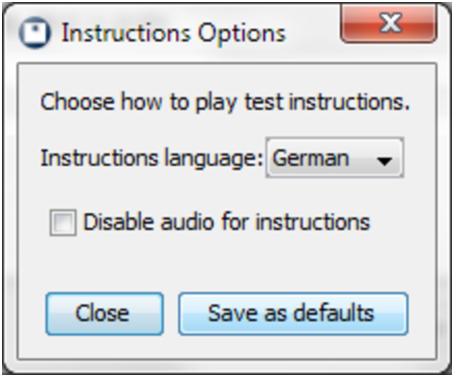 Choose a different language or mute the audio
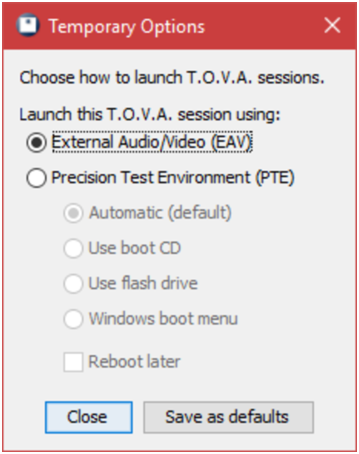 Change launch options for this session
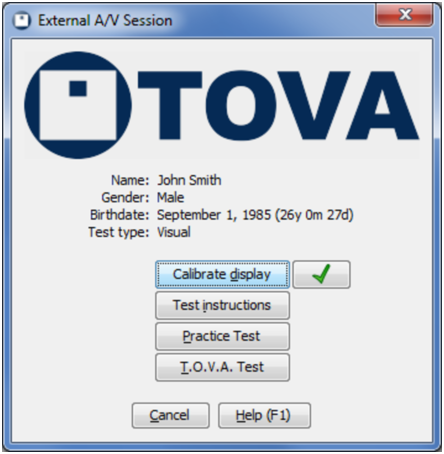 External A/V session
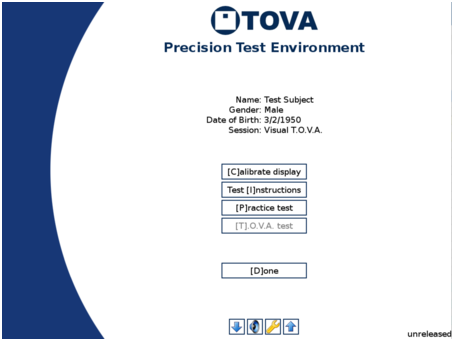 The Precision Test Environment
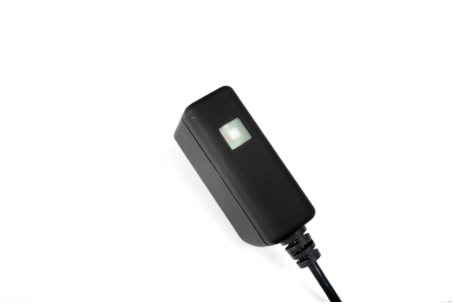 Microswitch light sensor
 Calibrating the T.O.V.A. to your display.
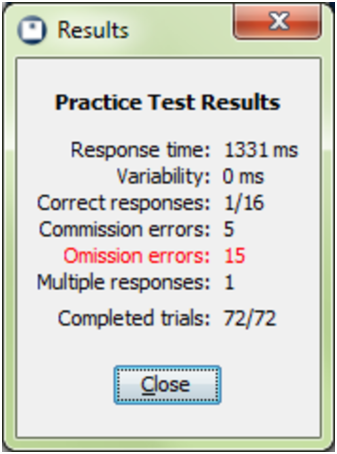 Results of a misunderstood practice test
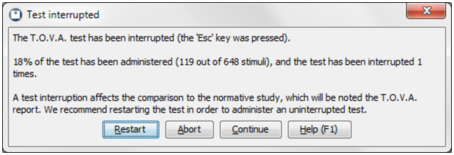 Interrupted External A/V test
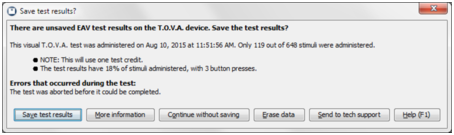 This test was completed with very few button presses.
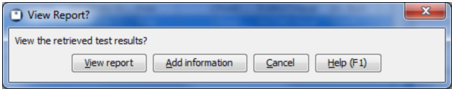 View the report on this T.O.V.A. data?
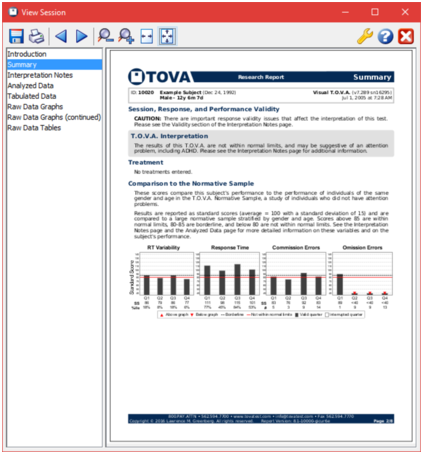 The T.O.V.A. Report
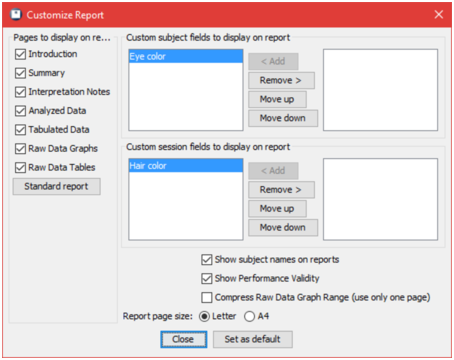 Select pages and fields to include
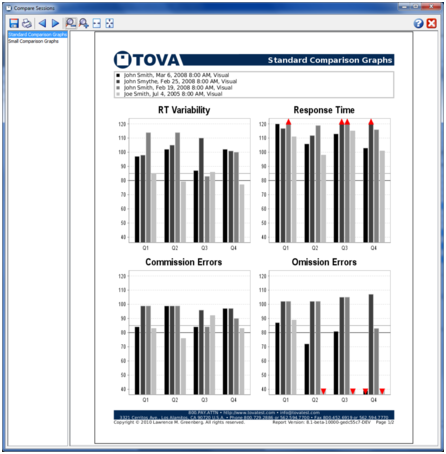 The Comparison Report
 Ordering test credits
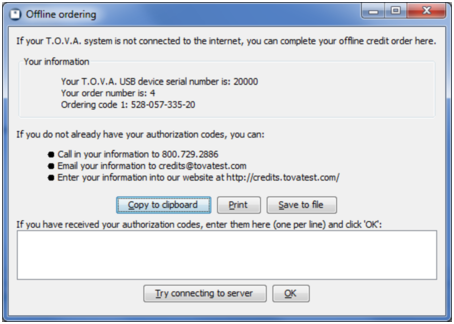 Offline ordering
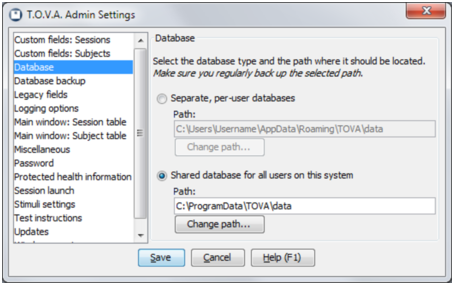 Database options
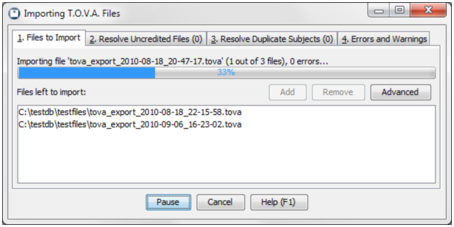 Files to Import tab
 Advanced settings
 Resolve Uncredited Files tab
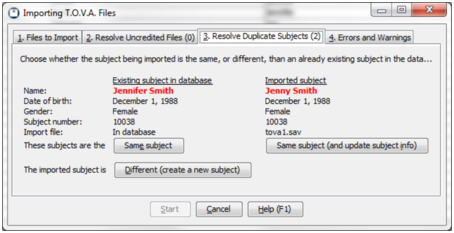 Resolve Duplicate Subjects tab
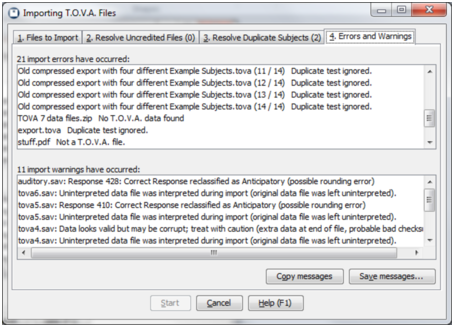 Errors and Warnings tab
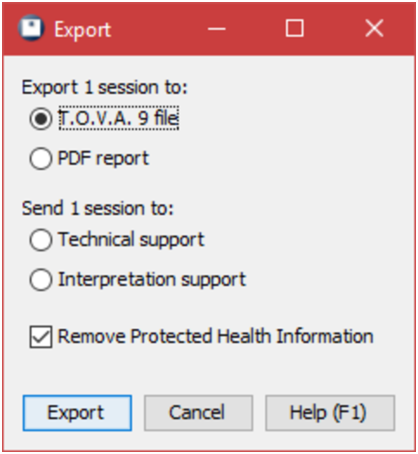 Export options
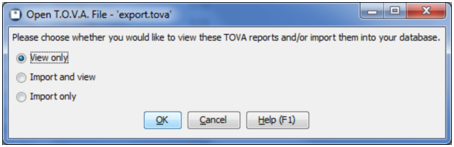 Opening a .tova file.
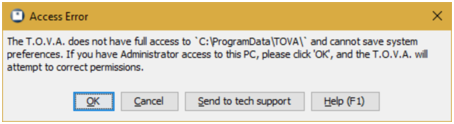 The T.O.V.A. needs full access to the shared TOVA folder
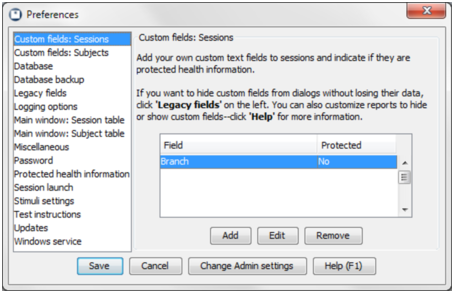 Custom Subject Fields
 Database options
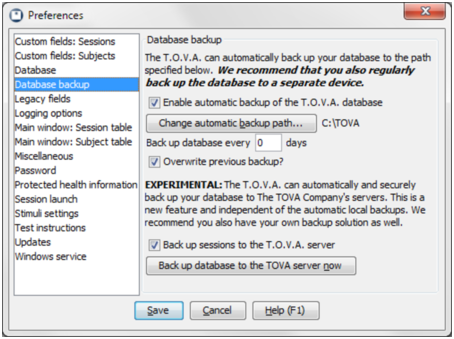 Back up your database automatically
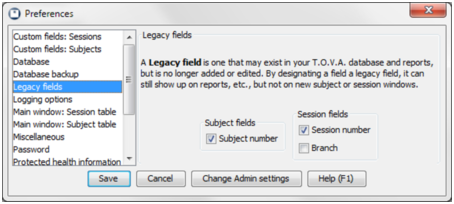 Legacy fields
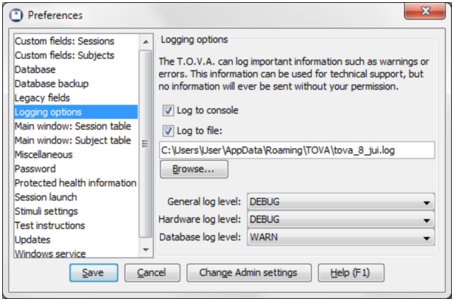 Logging options
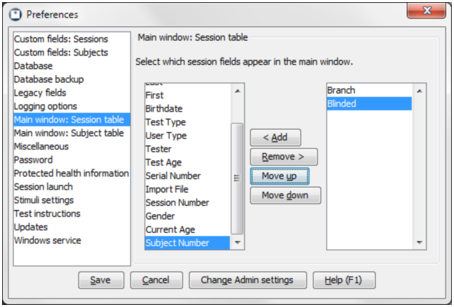 Session Table fields
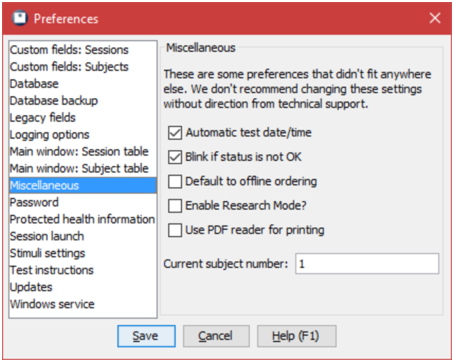 Miscellaneous preferences
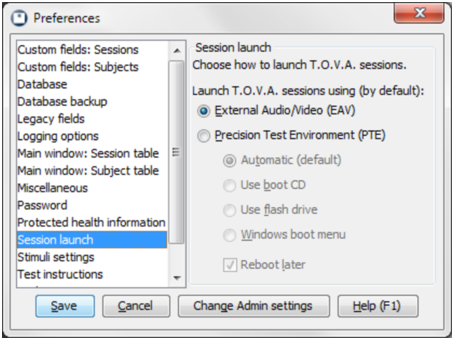 Session launch defaults
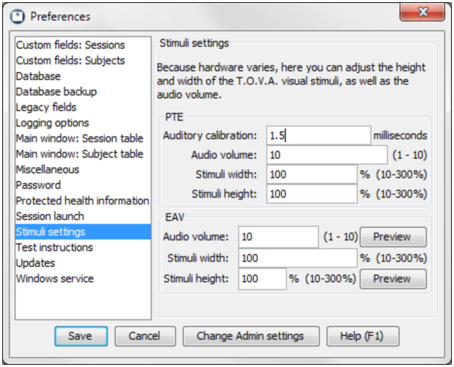 Stimuli settings
 T.O.V.A. Stimuli, Target and Nontarget
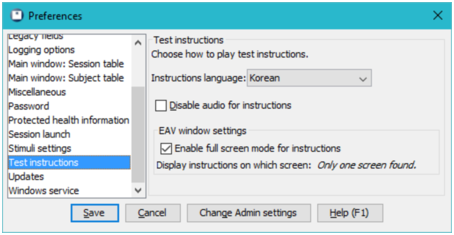 Test instruction options
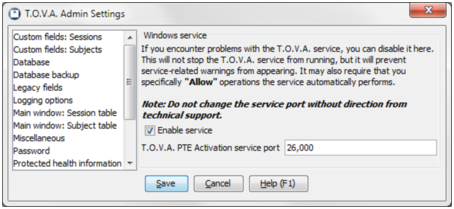 Windows Service preferences
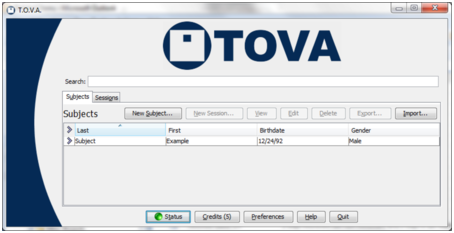 A green Status button indicates no known issues.
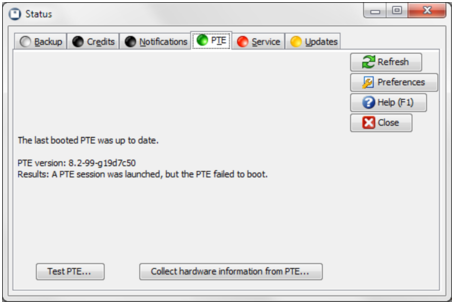 Colors indicate the condition of status categories
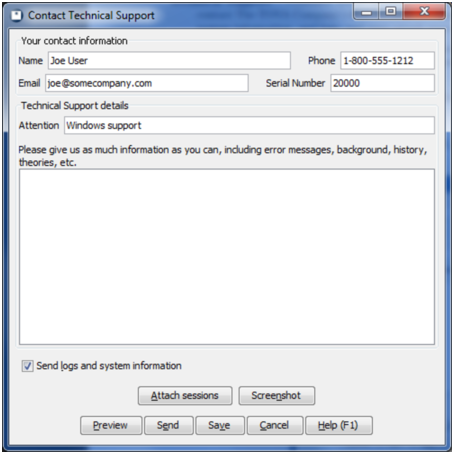 Contact Technical Support
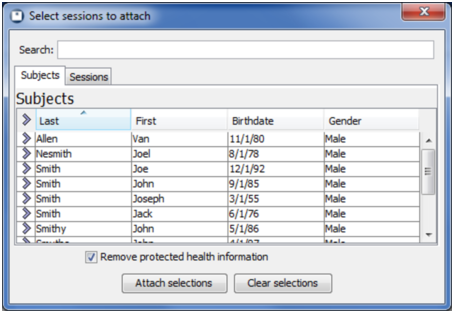 Send sessions with your support request
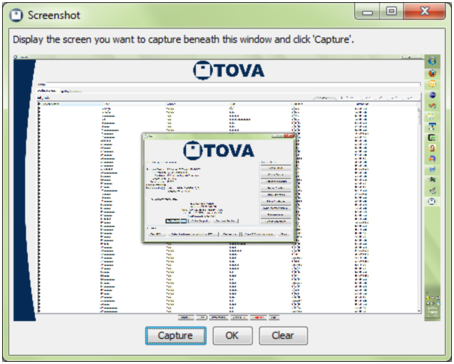 Use screenshot capture to show us your screen
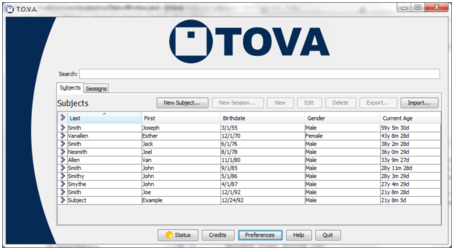 A yellow light on the Status button may indicate a software update
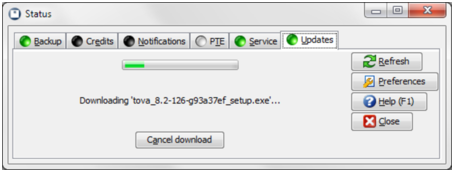 Downloading update
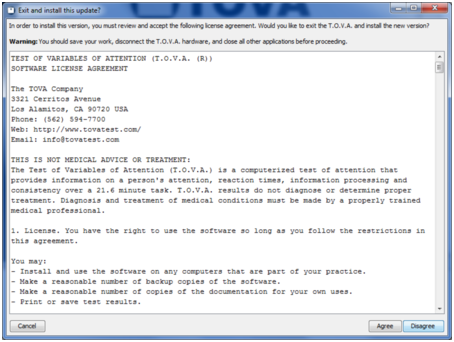 Review and accept the license agreement
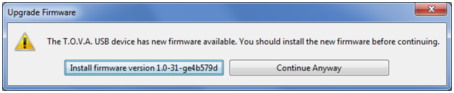 A new firmware update is available
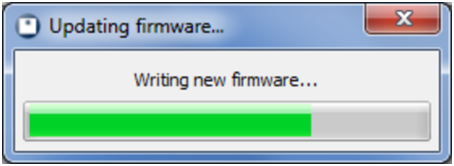 Updating the T.O.V.A. firmware
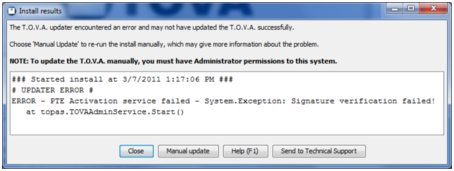 Downloading may have been interrupted. Try it again.
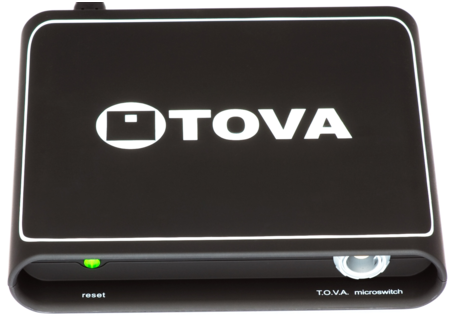 Front of the T.O.V.A. USB device
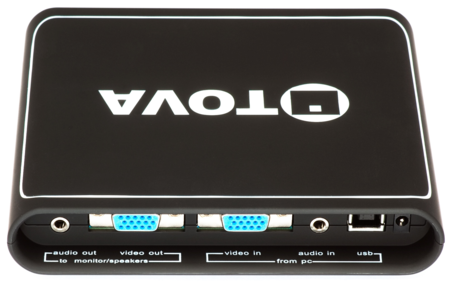 Back of the T.O.V.A. USB device
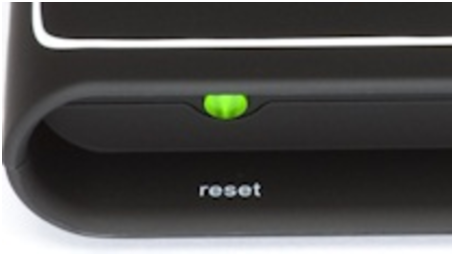 Reset light/button
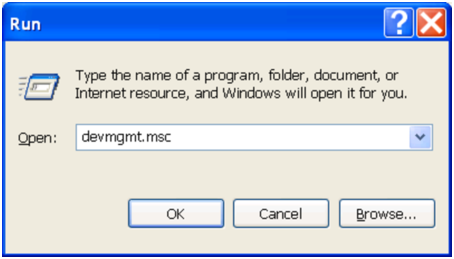 Run the Device Manager
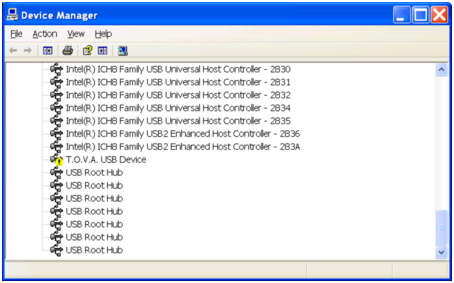 Missing driver in the Device Manager
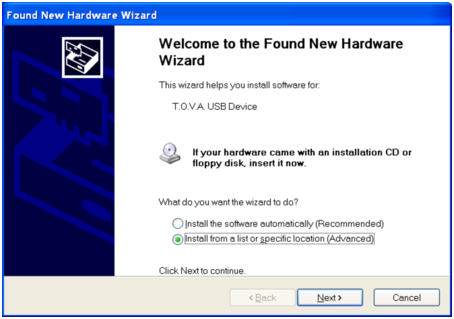 Found New Hardware Wizard
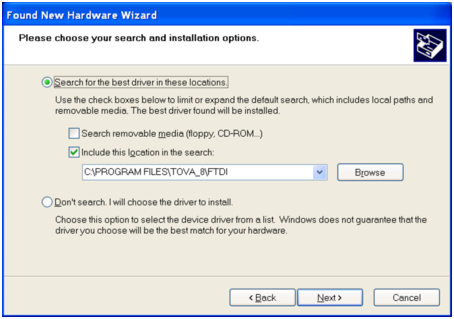 Direct the wizard to the T.O.V.A. drivers
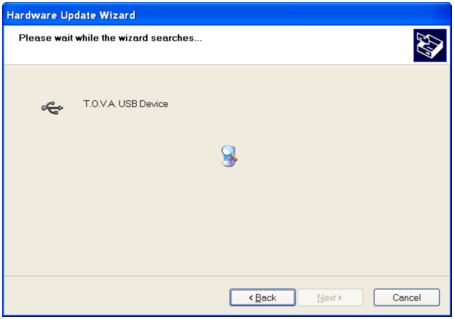 Searching for and installing the drivers
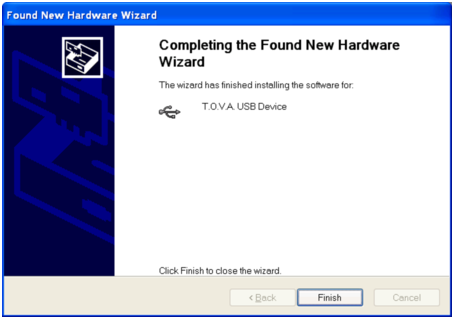 T.O.V.A. drivers installed!
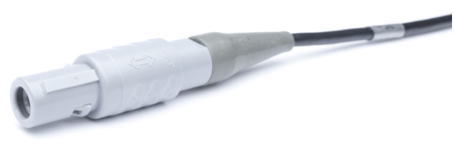 Connector
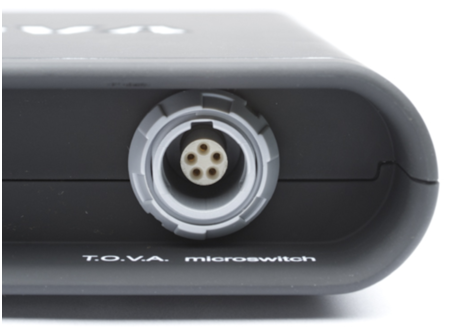 Microswitch Jack
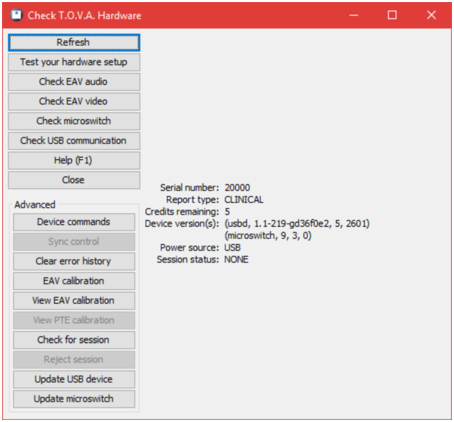 Check T.O.V.A. hardware window
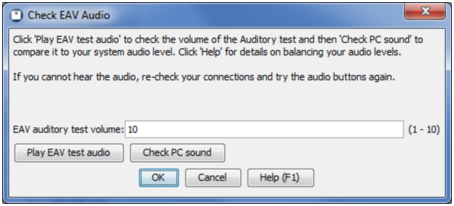 Check the audio volume for EAV testing
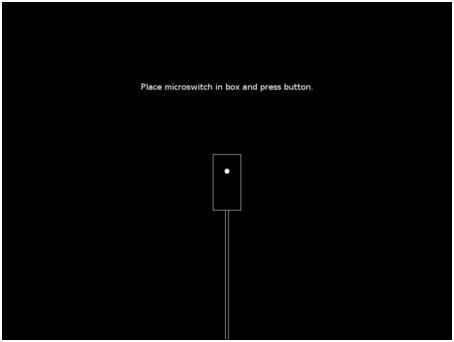 Hold the photodiode up to the rectangle on the screen
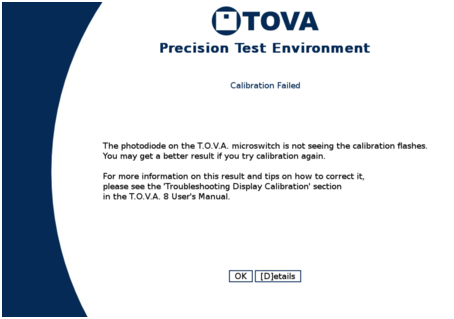 When calibration fails, try again, then consult this section
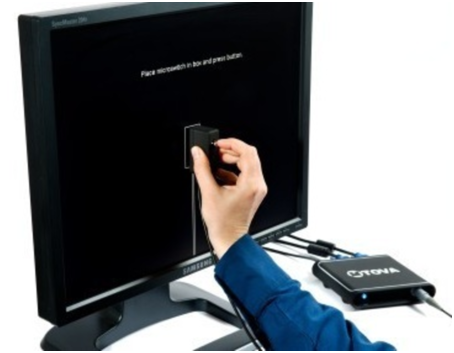 How to hold your microswitch for calibration
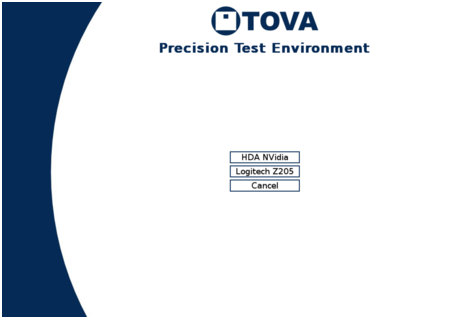
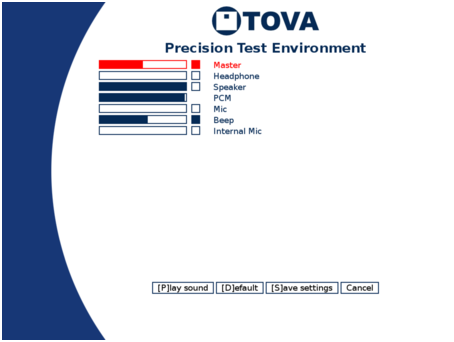 Only the Master and Beep channels are turned on here
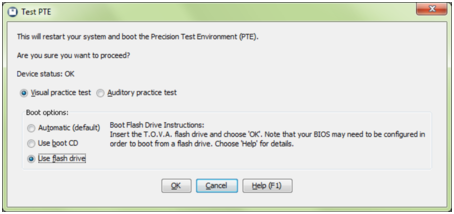 Test PTE options (PC)
 The Precision Test Environment
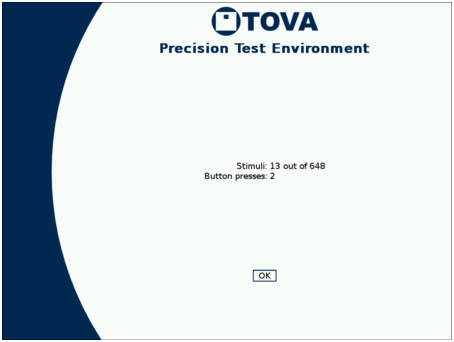 Results of an aborted PTE test
 The Advanced PTE menu
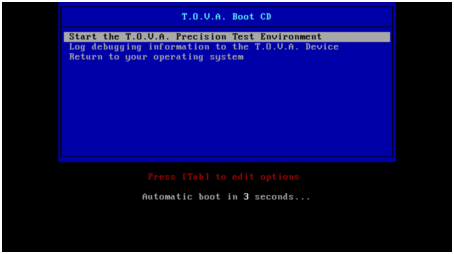 The PTE Boot CD menu appears for only three seconds
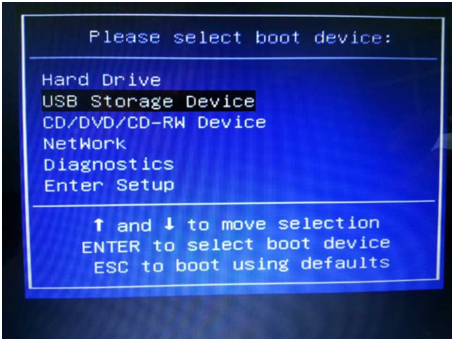 For the T.O.V.A. CD, look for “CD" or “DVD"
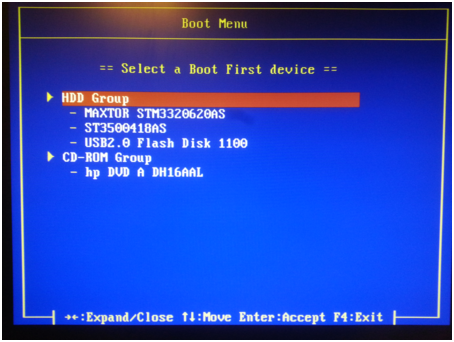 For the T.O.V.A. flash drive, look for ‘USB’ or ‘Flash’
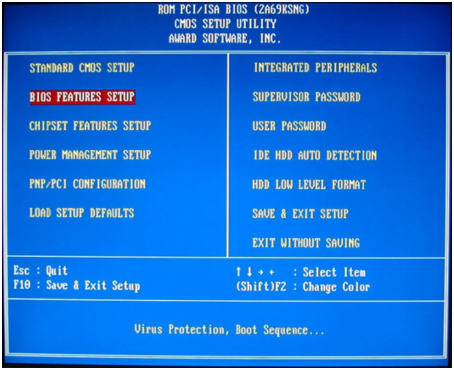 Award BIOS start screen, with the cursor on the correct section.
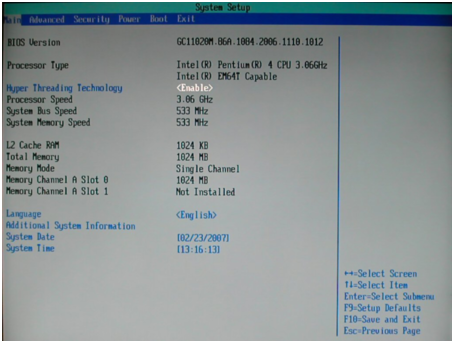 Intel BIOS start screen. You’ll want the
 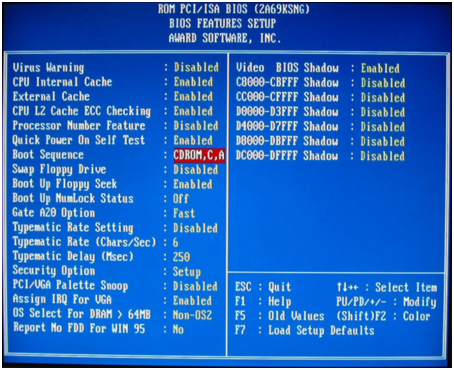 Award BIOS setup page, with the boot order entry highlighted.
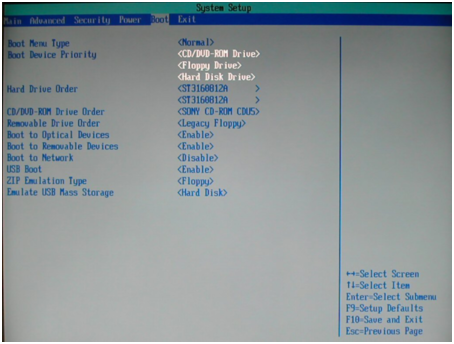 Intel BIOS boot screen, with the boot order entry highlighted.
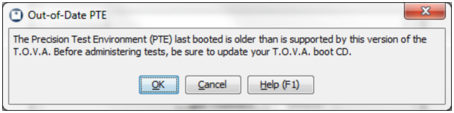 Keep your T.O.V.A. CD up-to-date
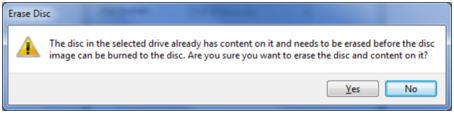 Erase warning—choose
 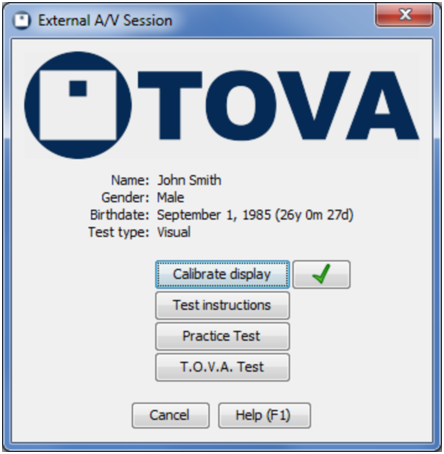 External A/V session
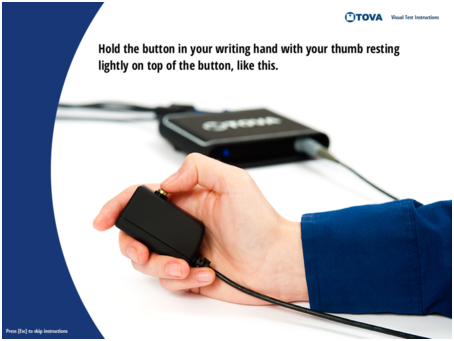 Test Instructions
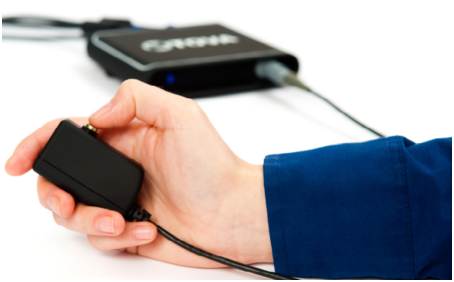 How to hold the microswitch
 Visual Test Target/Nontarget stimuli
 How to hold the microswitch
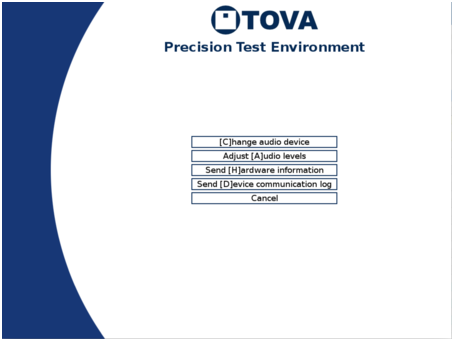 The advanced PTE menu
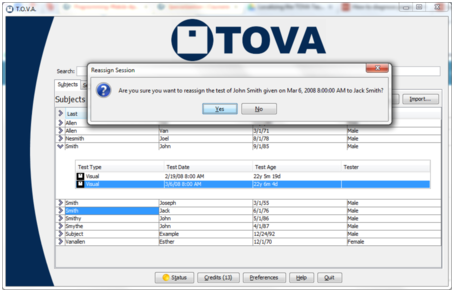 Click and drag the session
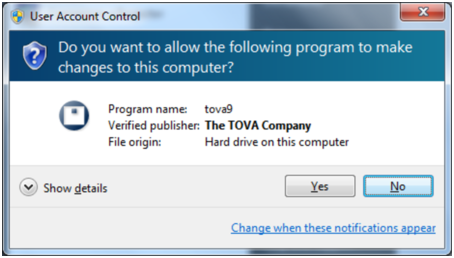 UAC message on Windows 7
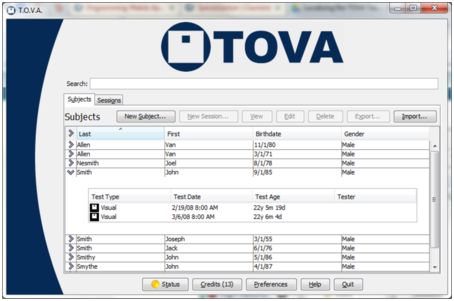 The main T.O.V.A. window
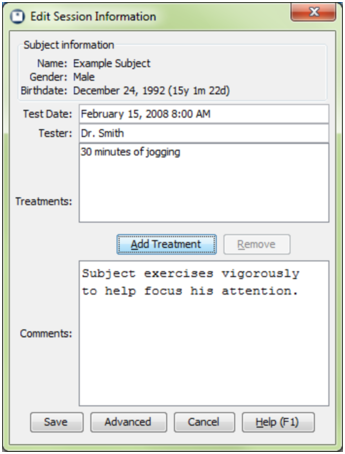 The Edit Session window
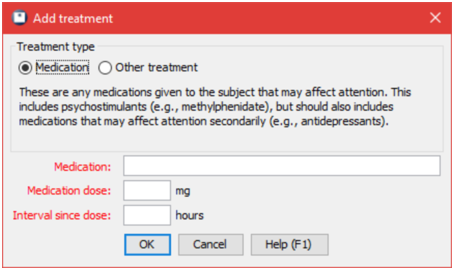 Enter the medication information
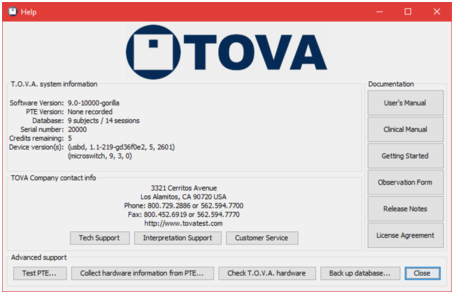 The Help Window
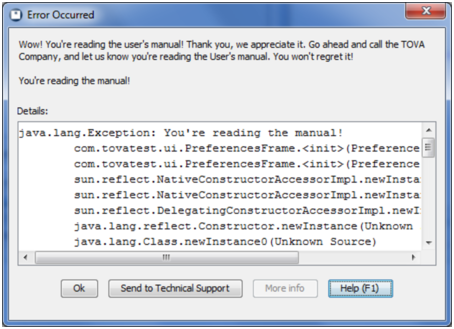 An Error window
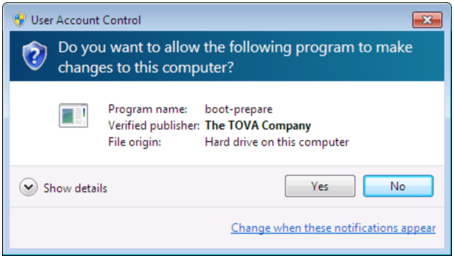 Without the service enabled, you must grant the T.O.V.A. permission to make changes
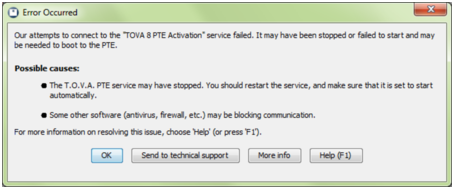 Failure to connect to the service
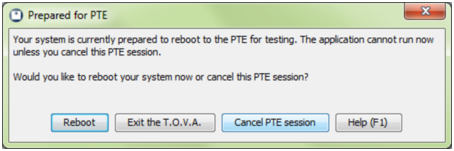 Ready to boot the PTE
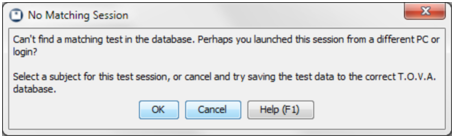 Find subject
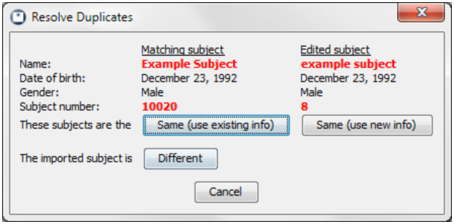 Are these actually the same subject?