


The TOVA Company is committed to helping our customers however we can to use the T.O.V.A. . That’s why you can reach out to us right from the T.O.V.A. application. The Help window (click ‘Help’ from the main window) contains three buttons to contact The TOVA Company:
And you can still always contact us by phone (1.800.PAY.ATTN or 562.594.7700), email (info@tovatest.com), or fax (800.452.6919 or 562.594.7770) instead.
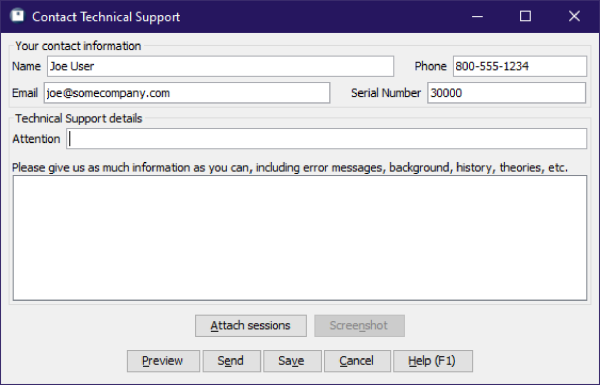
In Figure 52, we see the Contact Technical Support window. We’ll use it as our example.
This should be the best person for us to talk to or email about the issue. For a technical issue, it’s best if this person has full administrator access to the computer. For an interpretation issue, this will be a clinician. Information entered into these fields will be remembered and filled in automatically, so make sure to review and correct an email address or phone number that may have changed. Add any additional names, numbers, or email addresses to the large Details field.
In the large text field you can ask your questions or give us more information about technical issues. It’s okay to just leave the ‘Attention’ field blank, but if you’ve already talked to a specific technical support representative about this issue, please add their name here.
When you send a technical support request, we will collect information from your system that may help us resolve the issues. Specifically, we send these:
All of this information is technical and can often help us answer your questions and resolve technical issues. There’s a lot of information, and on some systems it may take a minute to collect and upload. Contact us if you’d like to more details about the information collected.
If you have questions for technical or interpretation support about specific subjects or sessions, you can attach them here. When you click the ‘Attach sessions’ button, you will be shown a list of subjects and sessions, along with a search bar, similar to the main window. Click to highlight the subject or session you want to attach (selecting a subject will attach all of their sessions). To select more than one, use ‘Ctrl’-click (Mac users, ‘Command’-click) to highlight each additional, or ‘Shift’-click to highlight a range.
Notice the checkbox at the bottom of Figure 53, ‘Remove Protected Health Information’. This is selected by default and will strip out of subjects or sessions you attach any information that would personally identify the subject. In rare instances where a question is specific to that personal information, you may uncheck this box. For more information on protecting personal health information, see section 26.
Click ‘Attach Selections’ to include those selected subjects and sessions or ‘Clear Selections’ if you decide not to attach any. When you’re finished, the ‘Attach sessions’ button will display a green check to indicate sessions are attached.
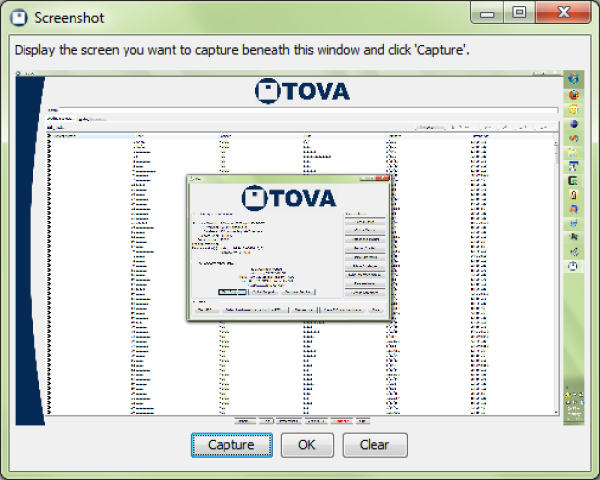
Sometimes something may be happening on the screen that’s hard to describe to technical support. Click the ‘Screenshot’ button, and a small window appears (see Figure 54).
When you click the ‘Capture’ button, whatever’s showing on the screen beneath will be attached as an image to your support request. A thumbnail of that image will then display in the Screenshot window. If it doesn’t look right, arrange your windows and try another capture. If you can’t tell, resize the window to make the captured image larger. When you’re finished, click ‘OK’ and the ‘Screenshot’ button will now have a green check, indicating your request has the screenshot attached. You may instead click ‘Clear’ if you decided not to attach any screenshot.
Preview lets you see all the information and files you’ll be sending us when you click the ‘Send’ button. It’s not necessary, but it’s there for the curious.
When you choose ‘Send’, all of the information you’ve selected will be collected together, compressed, and uploaded through your internet connection to us. This can be a lot of information, so it may take a minute. When it’s finished, you should see a message stating simply, “Your contact request succeeded.”
If, however, your upload fails, you might try the next option.
If your system is not connected to the internet, or if you have problems uploading your contact request, choose ‘Save’ to collect and save all the information to a file. Then you can copy the file to another system and/or attach it to an email to support@tovatest.com.
You can guess what these buttons do.
 Contact Technical Support
 Send sessions with your support request
 Use screenshot capture to show us your screen