


15 Installing the T.O.V.A. Hardware
The T.O.V.A. is software and hardware. The hardware includes:
-
T.O.V.A. USB device :
- The main T.O.V.A. box includes jacks for your VGA monitor (necessary for External A/V testing), speakers, the T.O.V.A. microswitch, and, of course, your computer. For more information, see section 31.1.
- T.O.V.A. microswitch:
- The T.O.V.A. microswitch is the input device to the T.O.V.A. test. For more information about the T.O.V.A. microswitch, see section 31.2.
- Cables:
- These are USB, video, and audio cables for hooking the T.O.V.A. hardware up to your computer. (No AC adapter is included as no additional AC power should be necessary.)
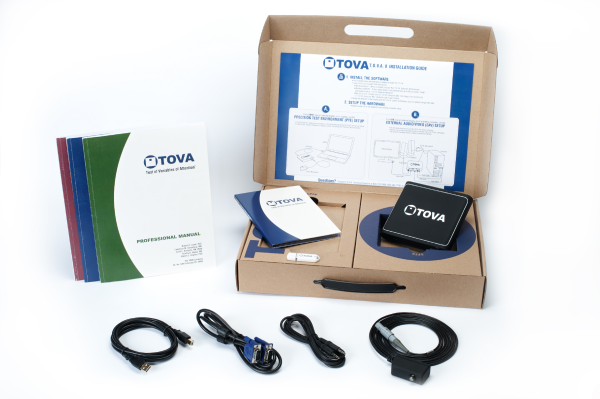
The T.O.V.A. Hardware
15.1 Basic (PTE) hardware setup
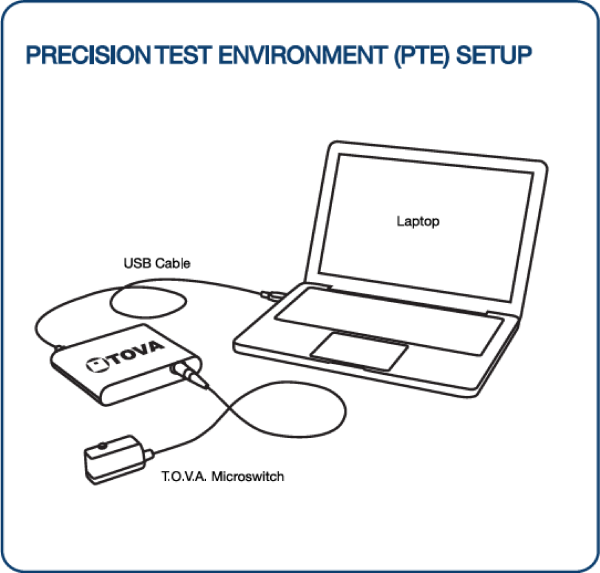
The PTE hardware setup
No qualification is necessary to install the T.O.V.A. software and hardware. T.O.V.A. hardware components are not user-serviceable and instead should be returned to The TOVA Company for repair. Technical Support is available if you have questions (section 29).
-
Unpack all of the T.O.V.A. hardware from the T.O.V.A. System.
- Plug the T.O.V.A. microswitch into the T.O.V.A. USB device where it’s labeled ‘T.O.V.A. microswitch’.
Line up the arrows on the top of the connector with the top of the T.O.V.A. device and push it gently into the port.
You do not need to twist or turn or squeeze in any way. See http://videos.tovatest.com for a demonstration.
- Find a USB port on your computer. If your computer is less than ten years old, you should have many on the front, back, or even sides of your computer. They are labeled with this symbol:
USB
- Plug the flat end of the USB cable into the computer’s USB port.
Note: Do not plug the USB cable into a USB hub. USB hubs will cause intermittent communication problems between the T.O.V.A. software and the T.O.V.A. USB device . USB hubs are not supported.
- Plug the squarish end of the same USB cable into the T.O.V.A. USB device where it’s labeled ‘usb’.
- See the section below for additional hardware setup.
15.2 External Audio/Video (EAV) setup
The External A/V (EAV) hardware setup is the most convenient to use and works with nearly any modern computer. Because it requires an external VGA monitor and some additional connections, it works best for desktop computers, but it’s compatible with any modern Windows or Mac computer.
15.2.1 Standard EAV desktop setup
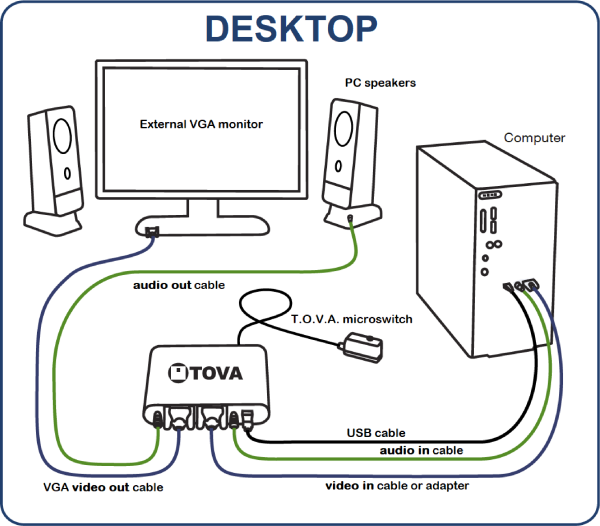
The EAV desktop setup
After you’ve connected the T.O.V.A. USB device to the computer as suggested above (section 15.1), add the following connections:
-
Unplug your monitor’s video cable from your computer’s VGA port and replace it with the included T.O.V.A. video cable.
- Plug your monitor’s video cable into the T.O.V.A. USB device where it’s labeled ‘video out’.
- Plug the included video cable into your T.O.V.A. USB device where it’s labeled ‘video in’.
- Unplug your speakers’ audio cord from the audio jack on your computer and replace it with the included T.O.V.A. audio cord.
- Plug your speakers’ audio cord into the T.O.V.A. USB device where it’s labeled ‘audio out’.
- Plug the included audio cable into your T.O.V.A. USB device where it’s labeled ‘audio in’.
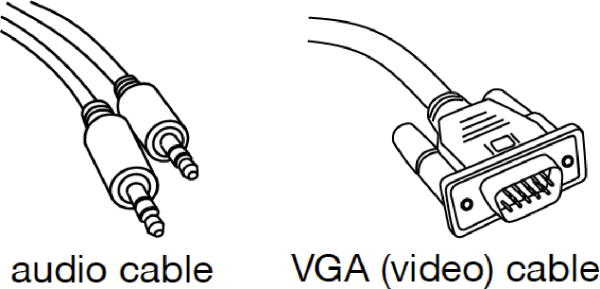
Audio and video cables
Now you should be set up to administer EAV sessions.
15.2.2 Alternative EAV hardware setups
The above instructions detail the full External Audio/Video (EAV) hardware setup, but there are a few alternatives to consider:
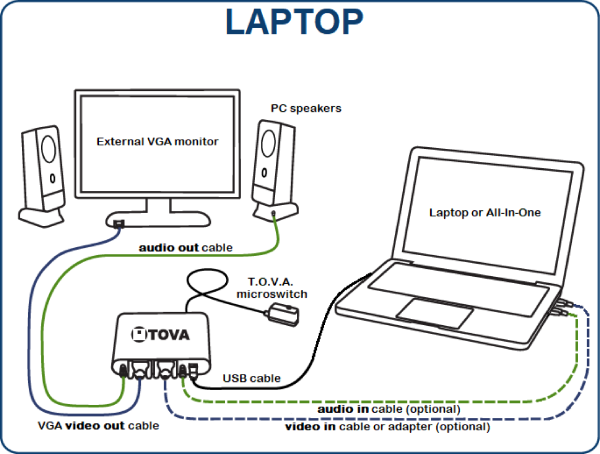
The EAV setup on a laptop
15.3 Other setup notes
-
If you have any problems, you can find instructional videos at http://videos.tovatest.com.
- If you are using two displays—either an external monitor plugged into a laptop or simply two different external displays—make sure that the subject cannot see the non-testing display during testing, as it could be distracting.
- The visual T.O.V.A. was normed using stimuli under the following conditions:
-
A 12-inch screen (measured diagonally)
- An eye-to-monitor distance of roughly 36 inches
- Stimuli appear as 3-inch squares (measured diagonally)
- Stimuli presented near the subject’s eye level
For more information, consult the T.O.V.A. Professional manual.
Note: You can adjust the stimuli size in the T.O.V.A. Preferences (section 27.14).
15.4 You’re done installing the T.O.V.A. hardware! Now what?
If you’re installing the T.O.V.A. for the first time, you should see the first page of the T.O.V.A. Hardware Setup wizard that immediately follows the Configuration wizard. We recommend that you complete the Hardware Setup wizard to confirm that you’ve attached your hardware correctly. Please continue on to the section 16.


 The T.O.V.A. Hardware