


The T.O.V.A. kit comes with a brushed metal T.O.V.A. flash drive, though your T.O.V.A. kit may have come with the older white flash drive. This flash drive contains installers for the T.O.V.A. software that came with your T.O.V.A. kit, as well as documentation such as the Installation Guide and User’s manual. The flash drive can also be used on some computers to boot the Precision Test Environment (PTE). If you do not have a T.O.V.A. flash drive and need one, please contact T.O.V.A. customer service.
The T.O.V.A. CD came with older versions of the T.O.V.A. kit, serving the same function as the T.O.V.A. flash drive. It can be updated to act as a boot CD for the legacy PTE, but this is only useful on computers old enough to still a) have a CD drive and b) support the legacy PTE. If you need to boot the PTE from a T.O.V.A. CD but don’t have one, you can create one from a blank CD-R instead (section 35.3).
Most computers should be able to boot the T.O.V.A. PTE automatically and won’t need a T.O.V.A. flash drive or CD. However, many systems will need to use the T.O.V.A. flash drive included in your kit, and will likely require some additional steps or configuration as well. If the T.O.V.A. doesn’t boot the PTE automatically, please contact T.O.V.A. tech support, and we’ll help you find the best approach for your system. You may also reach out to your organization’s IT department or ask your system’s manufacturer how to boot to a flash drive.
Your T.O.V.A. flash drive or CD also contains software installers and documentation, but we recommend you download the latest software for your T.O.V.A. hardware from our website instead: Go to https://www.tovatest.com/downloads and enter your T.O.V.A. serial number (found on a sticker on the bottom of your T.O.V.A. USB device or in the Help window of the T.O.V.A. application).
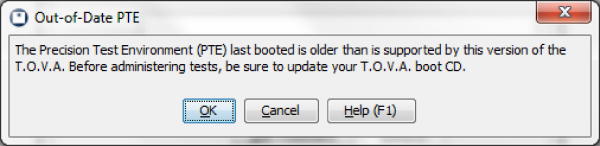
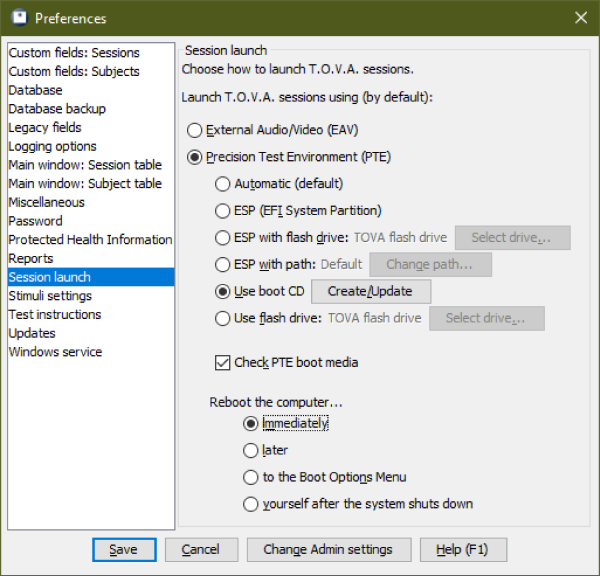
It is critical that the T.O.V.A. PTE remain up to date, with a version of the PTE that is compatible with your computer and the T.O.V.A. software. If you are using the T.O.V.A. flash drive to boot the PTE, and the T.O.V.A. application warns you that your PTE is out-of-date, you will need to update the flash drive.
Note: If you use a T.O.V.A. CD to boot the PTE, please see section 35.3 instead.
If you have a white T.O.V.A. flash drive, which comes up as tova8 or TOVA9, you will probably need to contact T.O.V.A. technical support to update or replace it. Note: It’s not as simple as just reformatting the drive.
If the drive has a brushed metal finish or shows a drive label of TOVATEST, it’s probably a newer T.O.V.A. flash drive, and the T.O.V.A. software should automatically update the flash drive for you. Make sure it’s plugged in when you launch a PTE session.
Note: If you have personal files on the T.O.V.A. flash drive, PLEASE copy them elsewhere before updating the drive.
If you are using a Mac, the T.O.V.A. software installs scripts for creating or updating T.O.V.A. flash drives to boot the current PTE versions.
When it has finished, you can use the T.O.V.A. flash drive to boot the current PTE. Please contact T.O.V.A. tech support (section 29) if you would like help or encounter problems.
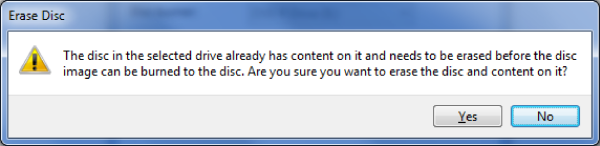
If you are using a T.O.V.A. CD, you may need to update it when you update the T.O.V.A. software, so that you’re using the current version of the legacy PTE. The T.O.V.A. CD itself was a CD-RW and can be updated by most CD-RW drives and CD creation software. If you do not have the T.O.V.A. CD, you can write the T.O.V.A. CD image to any blank CD-R ("burning" just means writing data to a CD).
The T.O.V.A. has a script for burning the current CD image:
When it has finished, your CD is up to date, and you can use the CD to boot the current legacy PTE.
Here’s how to burn a CD to boot the legacy PTE in Windows:
The burning process should take only a few minutes. When it’s done, you’ll have a fresh new T.O.V.A. CD with the current legacy PTE. If you encounter problems burning the CD, try wiping it clean with a tissue or using a different CD-R.
 Keep your T.O.V.A. CD up to date
 Configuring your system to use the T.O.V.A. CD
 Erase warning—choose